Quantcast
Channel: PHP – Xlinesoft Blog
Viewing all 95 articles
Browse latest View live

What to expect in version 10.3

$
0
0

We expect a beta version of PHPRunner, ASPRunner.NET, ASPRunnerPro 10.3 in the second half of September. You can also expect one more update (v10.4) to be released before the end of the year. Here are new features that will appear in this update.

1. Separate permissions for additional pages

It will apply to both Static and Dynamic permissions


2. Filters - grouping

If you have a database of orders and need to group it by date intervals like months or years - this feature comes handy.

3. Login via Google

Same as login via Facebook.

4. PDF API

Here are some PDF API use cases.

  • Create PDF, ask for user's email, email PDF file to that email address
  • Create PDF, ask user for file name, save it on the hard drive under that name
  • Create PDF and save in the database
  • Email selected records as separate PDF files

5. Dialog API

This is a really small but useful extension we developed while working on PDF API. Let's say you quickly need to ask the user for some info. Now there is no need to create a separate page for this purpose.

Here is the code that you can use in any Javascript event or button:

return ctrl.dialog( {
	title: 'Enter email',
	fields: [{
		name: 'email',
		label: 'Email',
		value: 'user@server.com'
		},
		'text']
});

And this is how it looks in the generated application.

6. Web.config editing

ASPRunner.NET only. Users will be able to modify web.config from ASPRunner.NET adding all required sections and variables.

7. BeforeConnect event

ASPRunner.NET only. It allows implementing dynamic connection strings. Useful in multi-tenant web applications or to retrieve connection string from Azure Key-vault.

8. Edit HEAD section

A separate HEAD section per project. Add favicons, meta tags, links to CSS/JS files etc.


Tri-part events

$
0
0

Tri-part events are a special code snippets that provide a convenient way of programming interactions between the browser and the webserver.

Why three parts?

Any web application consists of two parts - server and client. The client part runs in the browser on the computer of the web site visitor. This part takes care of all user interface interactions, such as buttons, input controls, blocks of text and images. Client-side code is written in Javascript in most cases.

Server part - this code runs on the webserver itself and has direct access to the database, can send emails, read and write files to the disk. In PHPRunner-created applications server code language is PHP, ASPRunner.NET uses C# or VB.NET, ASPRunnerPro uses Classic ASP.

Most real-life tasks though require a joint action of both client and server parts. For example, the user presses a button and wants something changed in the database, or an email being sent.
Tri-part events provide a relatively easy way to create such integrated code snippets.

They consist of three parts running one after another:

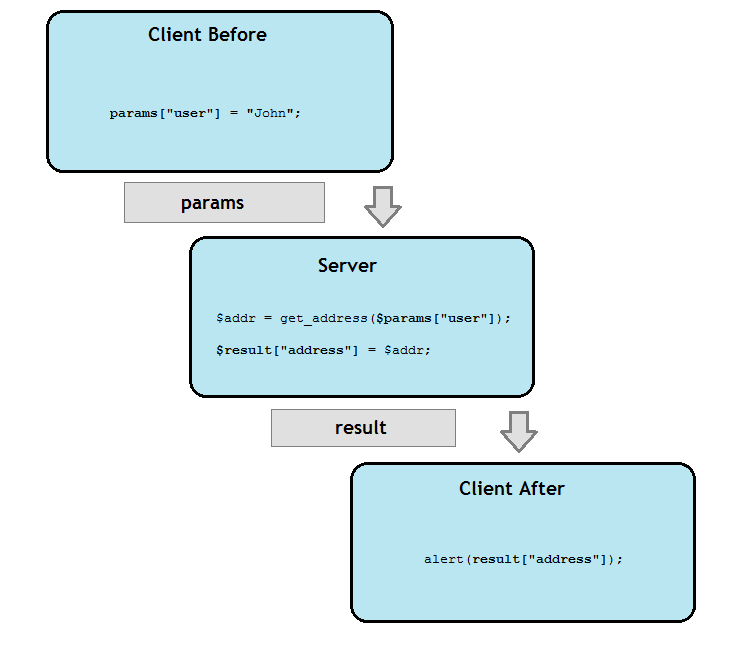
  • Client Before - this Javascript code is run immediately after user's action such as pressing the button.
  • Server - this part runs on the server after the Client Before part has finished. You can only user server-side code here (PHP, C# or ASP).
  • Client After - back to the web browser, another Javascript code part.

Passing data between events

To create a snippet serving a meaningful purpose these event parts must be able to pass data to one another. For example, the Client Before part gets input from the user passes it to the Server event. The latter runs some database queries using the data and passes the results to Client after, which shows them to the user.

Two objects serve as links between the three parts of the event.

  • params object helps passing date from Client Before to Server event.
  • result object helps passing data from Server to Client After event.

Mind the syntax difference between Client and Server events. The Client code is Javascript, and the Server code is PHP (C# or ASP).
The key names, user and address are up to you. Choose any names here.
You can also pass arrays and objects this way:

ClientBefore:

params["data"] = {
	firstname: 'Luke', 
	lastname: 'Skywalker'
};

Server:

do_something( $params["data"]["firstname"] );

Where in the software you can use it?

There are three features in PHPRunner/ASPRunner.NET/ASPRunnerPro that utilize the Tri-part events.

  • Custom buttons
  • Field events
  • Grid click actions

All these events work the same way. The only difference between them is how the user initiates the event - by clicking the button, interacting with an input control, or by clicking somewhere in the data grid.

Control flow

If you don't need the Server part, just return false in the Client Before code:

...
return false;
// all done, skip Server and Client after parts.

Asynchronous tasks

Some tasks in Javascript code are asynchronous, they are not completed immediately, but at some indefinite time in the future. You may need to wait for their conclusion before running the Server part of the event. In this case, return false from the Client Before event and call submit() function on the task conclusion.

Example:

// run Server event after 5 seconds pause:
setTimeout( function() { 
	submit();
}, 5000 );
return false;

Event parameters

PHPRunner passes the following parameters to ClientBefore and ClientAfter events:

  • pageObj - RunnerPage object representing the current page
  • ajax - Ajax helper object - provides miscellaneous functions like showing dialogs or generating PDF files
  • row - GridRow object - object representing a row in the grid. Buttons receive this parameter when positioned in the data grid on the List page. Field events receive it in the Inline Add/Edit mode
  • ctrl - in the Field events this parameter represents the input control itself. RunnerControl object.

SaaS application design

$
0
0

SaaS applications, also known as multi-tenant applications, are very popular these days. A single instance of the software is available to multiple customers/tenants. Each tenant's data is isolated and remains invisible to other tenants. All tenant databases have the same structure. The data is different, of course.


There are multiple ways to design and implement this kind of application in PHPRunner or ASPRunner.NET. You can get away using a single data to host all customers' data but using a dedicated database for each customer is easier and more reliable. In this article, we'll show the easiest way to build such an app.

You can see that we have a common saasdb database here and multiple identical client databases. We only need to add to the project one of those client databases, database1 one in our example.

Common saasdb database only contains a single table named users.

We will select this table as a login table on the Security screen. Based on the username we redirect users to their database. We would only need to add two lines of code to make this happen. Things will be slightly different in PHPRunner and ASPRunner.NET.

PHPRunner

1. AfterSuccessfulLogin event

$_SESSION["dbname"] = $data["database"];

Based on who is logged in we save database name in the session variable.

2. Server Database Connection

Proceed to the Output Directory screen, add a new Server Database Connection and modify the line where we specify the database name. This example is for MySQL. The point is to use $_SESSION["dbname"] instead of the hardcoded database name.

$host="localhost";
$user="root";
$pwd="";
$port="";
$sys_dbname=$_SESSION["dbname"];

ASPRunner.NET

1. AfterSuccessfulLogin event

XSession.Session["database"]=data["database"];

2. BeforeConnect event

.NET applications are compiled before they can be deployed meaning that we cannot use any code in a new Server Database Connection. For this specific reason, we have added BeforeConnect event in ASPRunner.NET v10.3.

This is how default connection string looks (as shown in the event Description):

GlobalVars.ConnectionStrings["database1_at_localhost"] = "Server=localhost;Database=database1;User Id=root;Password=";

This is how we need to change it to grab database name from the session variable:

GlobalVars.ConnectionStrings["database1_at_localhost"] = 
String.Format("Server=localhost;Database={0};User Id=root;Password=", XSession.Session["database"]);

This is it. If you logon as user1 now you will see two records in the Customers table.

And if you logon as user2 you will see three records in the same table, because we are connected to database2 now.

Of course, creating a fully-featured SaaS application takes more than two lines of code. You need to take care of user registration, create new databases on the fly, upgrade all databases when database structure changes, maybe add the billing part etc. But this article should definitely help you get started.

Making new record visible on the List page

$
0
0

When we added a new record and returned back to the List page that new record may not be clearly visible on the page. Depending on what page we on, what sort or is applied, how many records are on the page - we may simply be on the wrong page. This can be useful when, for instance, you are transferring a large amount of data from paper to the database and this kind of visual indication can be helpful to keep track of the process.

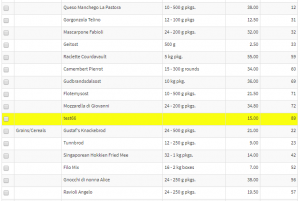
In this article, we will show you a technique that does the following. After the new record is added we find out which page it belongs to, redirect the user to that page, highlight the record and also scroll the page if the record is below the fold.

Things to change in the code:
- products - the name of the table, we need it for the redirect
- ProductID - the name of the key column

1. Add page: AfterAdd event:

Saving new record ID in the session variable. Execute previously saved SQL query, loop through the recordset finding our new record. Redirect to the corresponding page.

$_SESSION["ProductID"]=$keys["ProductID"];

$i=0;
$rs = DB::Query($_SESSION["ProductsSQL"]);
 
while( $data = $rs->fetchAssoc() )
{
$i++;
if ($data["ProductID"]==$keys["ProductID"])
	break;
}

$page = floor($i / $_SESSION["pageSize"] )+1;

header("Location: products_list.php?goto=".$page);
exit();

2. List page: BeforeSQLQuery event

Saving the current SQL query and page size in session variables

$_SESSION["ProductsSQL"] = $strSQL;
$_SESSION["pageSize"] = $pageObject->pageSize;

3. List page: AferRecordProcessed event

Changing the background color of the new record.

if ($data["ProductID"] == $_SESSION["ProductID"] )  
$record["css"]="background:yellow;";

4. List page: BeforeDisplay event

Bullets 4 and 5 are only required if you display a lot of records on the list page and need to scroll the page so the new record is visible. This code most likely is not required if you only display twenty records per page.

$pageObject->setProxyValue("ProductID", $_SESSION["ProductID"]);

5. List page: Javascript OnLoad event

var allRecords = pageObj.getAllRecords();
allRecords.forEach(function(row){
if( row.getFieldText('ProductID')==proxy['ProductID']) {
$([document.documentElement, document.body]).animate({
        scrollTop: row.fieldCell('ProductID').offset().top
    }, 2000);
}
})

Enjoy!

Making search panel horizontal

$
0
0

The search panel is displayed vertically on the left side of the List page by default. Sometimes you need to make it more prominent and place it above the grid, just like on the screenshot below.

Doing so is fairly simple.

1. Changes in Page Designer

Proceed to the List page in Page Designer and drag the search panel block to the cell above the grid.

2. Custom CSS

Now we need to make sure that search controls appear horizontally and also that search panel takes the whole horizontal space. To do so we can use the following CSS code under Eidtor->Custom CSS. By default, all DIVs are displayed vertically, one under another so we needed to use float: left to make them align horizontally. More info about float property.

.form-group.srchPanelRow.rnr-basic-search-field, div.srchPanelRow.form-group {
float: left !important;
margin: 5px;
}

.searchOptions.panel.panel-primary.searchPanelContainer, div[data-cellid=above-grid_c1] {
width: 100% !important;
}

It is worth mentioning that the following two tutorials helped us build this CSS.
Introduction to Custom CSS
Choosing the correct CSS selector

Autofill based on two fields selection

$
0
0

Autofill is a handy feature that allows quickly fill multiple fields after lookup wizard selection. However, it only works based on a single lookup wizard selection. In this article, we will show a more advanced example of implementing a custom Autofill based on two field selection.

field1 - first lookup wizard
field2 - second lookup wizard
field3 - field to be filled after field2 selection
table1 - lookup table where autofill data is coming from

Create a field event based on 'editing' for field2.


ClientBefore code

var field1 = ctrl.getPeer('field1');
var field2 = ctrl.getPeer('field2');
params["field1"] = field1.getValue();
params["field2"] = field2.getValue();

Server event

PHP code

$result["field3"] = DBLookup("SELECT field3 from table1 where field1 = ".$params["field1"]." AND field2 = ".$params["field2"]);

C# code

dynamic result = XVar.Array();
result.InitAndSetArrayItem(tDAL.DBLookup(MVCFunctions.Concat("SELECT field3 from table1 where field1 = ", params["field1"], " AND field2 = ", params["field2"])), "field3");

ClientAfter code

var field3 = ctrl.getPeer('field3');
field3.setValue(result["field3"]);

More info about field events:
PHPRunner
ASPRunner.NET

Version 10.4

$
0
0

Version 10.4 beta is here!

Here are the links to download the beta version:

PHPRunner 10.4 beta

ASPRunner.NET 10.4 beta

Please note that this is the beta version and some things may not work as expected. We expect the final version to be ready in about two weeks. New download links and keys will appear under your control panel.

The two most important features in this update are our own REST API and also the consumption of data, provided by third-party APIs. Consumption of third party data turned out to be the most difficult task and took more time than we expected, hence the delay. On the plus side, we now able to work with any data, not just something that comes as a result of the SQL query. And this also helped us implement a few minor but frequently requested features like OR search or data filtering in charts.

REST API consumption

REST Views

Data received from REST API providers like Spotify or Football API. In this article we will show you how to display the list of English Premiere League matches using Footbal API.

1. Add REST API connection and REST View

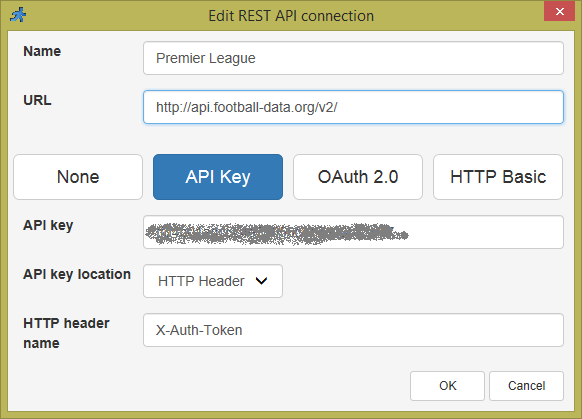
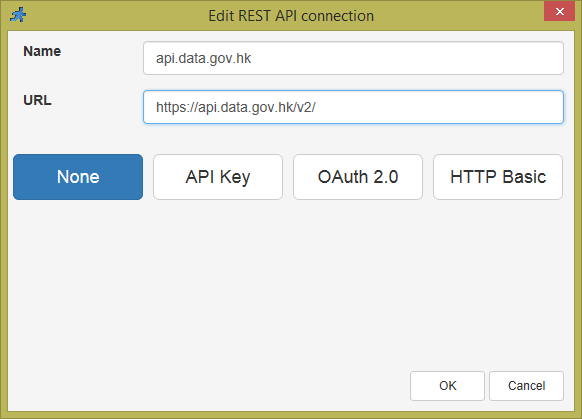
Here is how REST API connection setup looks like.

Note: OAuth authorization doesn't work yet.

Both the base API URL and authorization method are provided by the REST API provider. What kinds of views to create - depends on the API itself. For instance, Football API offer the following "resources": competitions, matches, teams, standings, and players. It is natural to create the same REST Views in your project. In this specific project, we are creating Matches and Teams views.

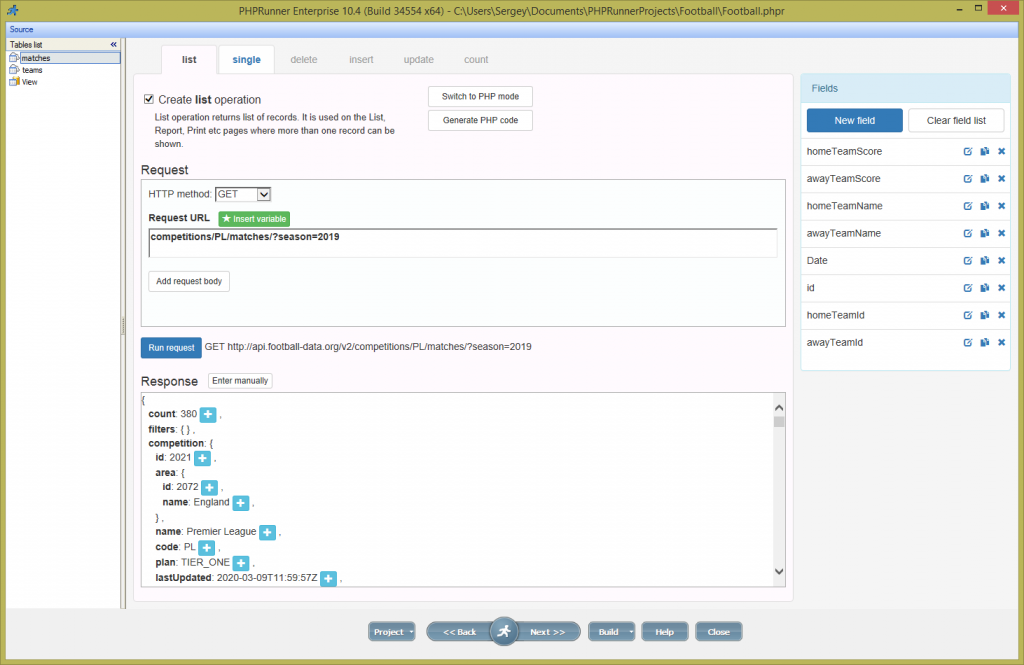
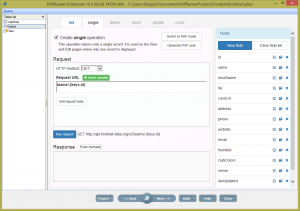
2. Configure URL, execute the List request, add fields

REST View setup, List operation.

You can see that in this view we limit it to season 2019 of the Premier League. This is where we found some sample requests.

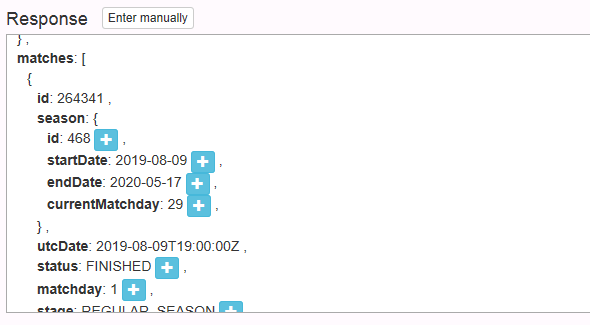
You enter the Request URL, it gets added to the base REST API URL and shows the actual request being performed. If your URL is correct, run the request and get the response back in JSON format. You can see it in the Response area. Retrieving and parsing the response may take a bit of time, depending on the API. You can also copy and paste the sample JSON response from the

Now there is time to add fields. The easiest option is to use a plus button in the Response area. Make sure you are finding the correct field in the response. For instance, in this response, there is also competition info, season info, venue, referees etc. Again, it all depends on the specific API. Once we found and added our fields we also need to assign meaningful names to them. There might be several fields named ID, Name. We'd rather deal with names like homeTeamName, awayTeamName etc.

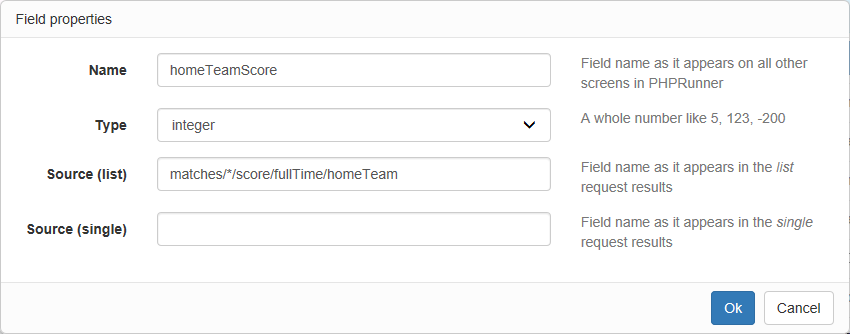
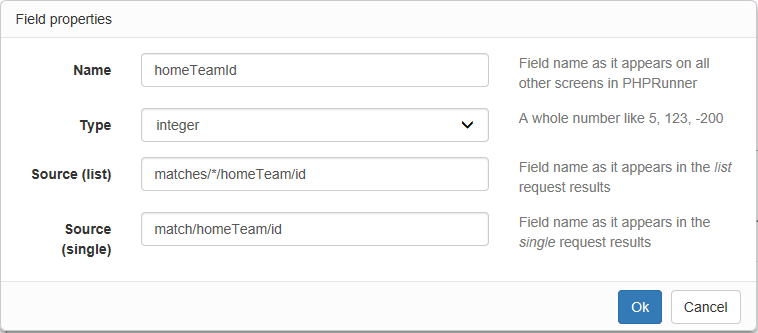
Here is how the field settings are going to look at this moment. Your job is to assign it a meaningful name and make sure that the correct data type is selected.

* in Source(list) means a list of items, for instance, matches/*/score/fullTime/homeTeam means a list of matches where * will be replaced with real IDs like 1, 2, 3 etc. You don't need to worry about the syntax as our software handles this for you.

Now you can build your project, run it and you will see the list of English Premier Leagues from season 2019 on your screen. Isn't it cool? This is your first REST API View and it works!

Now you can choose what fields to show on the List page and in which order, choose what fields to make searchable, what 'View as' format to use etc. In other words - the rest of the software works exactly the same way as at did with data coming from the database.

3. Configure URL for the Single operation, execute, add fields

Next step - let's create a Single operation, which is basically a view page. Proceed to the Pages screen and choose id as a key column. Again, this name depends on the API you use and may be different in your case.

Go back to REST View setup screen and enable Single operation. From the REST API docs we can see that a single match request looks like this: https://api.football-data.org/v2/matches/xxxxxx where xxxxxx is our match id, received via List operation. So, into the Request URL field we enter matches/ and then use 'Insert variable' to select keys.id variable.

Now we can run this request. Since we use a parameter there the software will ask you to provide one. We can go back to the List operation screen and copy match id (264341) from there.

Now you do the same thing - add fields from the Single operation response. If REST API is well designed and fields named in a similar manner then it will simply populate Source (single) part of the field properties.

In some cases, the software won't recognize that the field was created already and will add a new one like id1, id2 etc. In this case, proceed to id1 field properties, copy Source (single) path and paste to id field Source (single) part. After that id1 field can be safely deleted.

Once you do this for all fields you need to appear on the Single (View) page, proceed to the 'Pages' screen, enable 'View' page and build your project. You can now access the View page from the List page.

4. Creating Teams view and linking it from Matches view

Let's create a similar REST View for the Teams. I will just show screenshots of how List and Single operations should look.

List operation:

Single operation:

You can add Team fields the same way as described in the Matches View section. Now let's go back to Matches List View and make sure that both Home Team ID and Away Team ID appear on the List view.

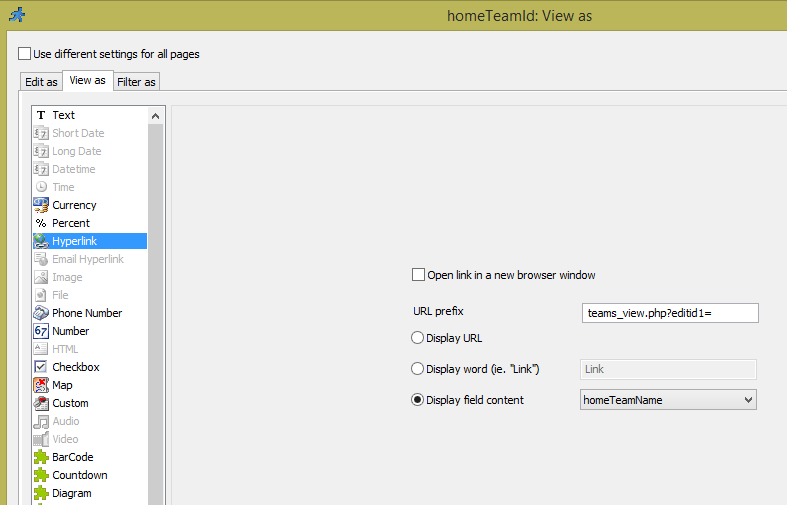
Proceed to homeTeamID 'View as' settings and configure it as a link that points to the corresponding Teams View page.

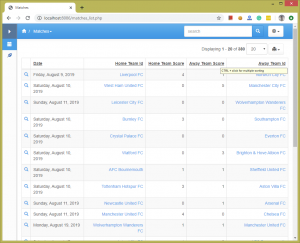
This is pretty much it for now. Now if you build your app and run it in the web browser you will see something like this.

5. Other REST View operations

Since this API only provides the read-only access to data we won't need insert, update or delete operations. We will come with examples of using these operations later. The count operation is only required when REST API provides pagination option.

SQL Views

The new functionality offers a lot more than just data received via REST API.

You can now use any non-standard SQL Query to retrieve data i.e. you can use MySQL variables in your SQL Query or use stored procedures to retrieve data. Let's see how to work with stored procedures. In this example, we will work with MySQL and Northwind database.

First, let's create a stored procedure:

DELIMITER //
CREATE PROCEDURE categories_search 
(IN a VARCHAR(50))
BEGIN
  SELECT * from categories
  where Description like concat('%', a, '%');
END //
DELIMITER ;

It doesn't do much but returns a list of categories that contain the word passed there as a parameter. We can test in in phpMyAdmin this way:

call categories_search('fish')

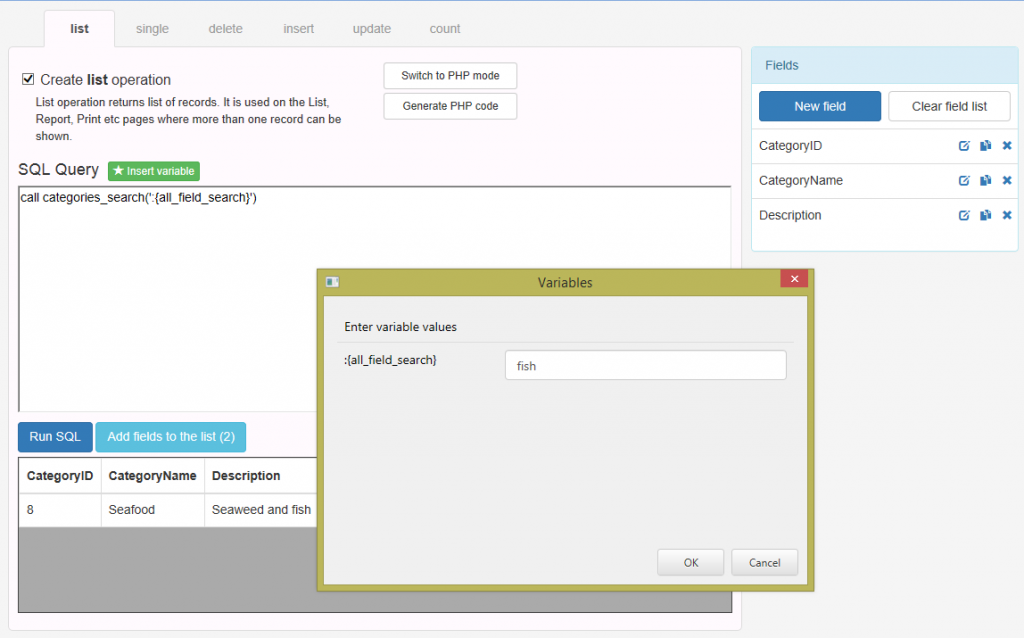
Once we made sure that stored procedure works we can create a SQL View based on this stored procedure call. We will use 'All fields search' variable as a parameter. Note that we added single quotes around the parameter since this is a text variable. And, of course, we didn't have to remember this variable name, we added it via Insert variable->All fields search.

Now we can run this procedure, get results back, add fields to the list and proceed to build the project.

Note: 'All fields search' parameter will be empty on the initial page load. You need to make sure that your stored procedure won't break if an empty parameter is passed there. This is, of course, not a problem, if your stored procedure doesn't take any parameters.

Any PHP or C# code

For instance, you can display a list of files from the file system. Handy, if you need to implement a file manager. PHPRunner and ASPRunner.NET will build the sample code for you and you can extend it any way you need it. Here is an example of just supplying some data as an array:

$data = array();
$data[] = array("id"=>1, "name"=>"aaa");
$data[] = array("id"=>2, "name"=>"bbb");
$data[] = array("id"=>3, "name"=>"ccc");
$result = new ArrayResult( $data );

if( !$result ) {
	$dataSource->setError( DB::LastError() );
	return false;
}
// filter results, apply search, security & other filters
$result = $dataSource->filterResult( $result, $command->filter );
// reorder results as requested
$dataSource->reorderResult( $command, $result );
return $result;

You will also need to define two fields, id (integer) and name (varchar). This is it, you can build your app and all functions like search, filters, pagination will work out of the box. If you ever needed to build pages that are not tied to any database table - your prayers were answered. You can use Code Views, for instance, to build a feedback form where data entered by the user is sent to your email.

REST API

As a first step enable REST for your project under Miscellaneous->REST API.

REST API Events

Since REST API interaction is fully UI-less, not all events make sense. Here is the list of events that will be executed for requests made via REST API:

  • AfterAppInitialized
  • AfterTableInitialized
  • BeforeAdd/AfterAdd
  • BeforeEdit/AfterEdit
  • BeforeDelete
  • After record deleted

REST API Authorization

Skip this section if your project doesn't have the login page enabled.

Beta version supports Basic HTTP Authorization only. In the final version we will also add API keys support.

REST API considerations

URLs

URLs and URL parameters should be URL encoded. For instance instead of "order details" you need to use "order%20details".

This is correct:

curl "http://localhost:8086/api/v1.php?table=order%20details&action=view&editid1=10248&editid2=42"

In this is not:

curl "http://localhost:8086/api/v1.php?table=order details&action=view&editid1=10248&editid2=42"

And response will be:

{
error: "Unknown table name",
success: false
}

List of fields

For now, all fields that appear in the SQL query will be returned in case of list/view or updated in case of update/insert. Later we will have an additional option to choose fields that are updatable or selectable via REST API.

Files upload

Not supported for now

Advanced Security

If Advanced Security mode like "Users can see and edit their own data only" is enabled in the wizard it will be also applied to the REST API requests.

Search and pagination

Support of search and results pagination will be added in the final version.

REST API Code Examples

list

Returns a list of records.

Sample request URL:

curl "http://localhost:8086/api/v1.php?table=customers&action=list"

Sample response:

{
  "data": [
    {
      "CustomerID": "ANATR",
      "CompanyName": "",
      "ContactName": "Morris H Deutsch",
      "ContactTitle": "",
      "Address": "8799 Knollwood dr",
      "City": "Eden Prairie",
      "Region": "MN",
      "PostalCode": "55347",
      "Country": "United States",
      "Phone": "2027280820",
      "Fax": "(5) 555-3745",
      "Lat": "44.8436452000",
      "Lng": "-93.4535225000"
    },
    {
      "CustomerID": "ANTON",
      "CompanyName": "Antonio Moreno Taqueria",
      "ContactName": "Antonio Moreno",
      "ContactTitle": "Owner",
      "Address": "Mataderos 2312",
      "City": "Mexico",
      "Region": "",
      "PostalCode": "33333",
      "Country": "Mexico",
      "Phone": "(5) 555-3932",
      "Fax": "",
      "Lat": "32.5053534000",
      "Lng": "-117.0668113000"
    }
],
  "success": true
}

view

Sample request URL:

curl "http://localhost:8086/api/v1.php?table=customers&action=view&editid1=WOLZA"

Sample request URL with multiple key columns:

curl "http://localhost:8086/api/v1.php?table=order%20details&action=view&editid1=10248&editid2=42"

Sample response:

{
data: {
CustomerID: "WOLZA",
CompanyName: "Wolski Zajazd",
ContactName: "Zbyszek Piestrzeniewicz",
ContactTitle: "Owner",
Address: "ul. Filtrowa 68",
City: "Warszawa",
Region: "",
PostalCode: "1",
Country: "Poland",
Phone: "(26) 642-7012",
Fax: "(26) 642-7012",
Lat: "52.2195630000",
Lng: "20.9858780000"
},
success: true
}

update

Data is passed in the form urlencoded format as fieldname=value&fieldname1=value1 list.

Example:
Update customer with CustomerID (key column) KOENE setting ContactName to be Bill Gates.

curl -X POST "http://localhost:8086/api/v1.php?table=customers&action=update" -d "editid1=KOENE&ContactName=Bill Gates" -H "Content-Type: application/x-www-form-urlencoded"

Sample success response:

{
  "success": true
}

h4>insert

Similar to update except you do not need to supply editid1 parameter.

Example:
Add a category named Beer with Description Beer and stuff.

curl -X POST "http://localhost:8086/api/v1.php?table=categories&action=insert" -d "CategoryName=Beer&Description=Beer and stuff" -H "Content-Type: application/x-www-form-urlencoded"

And response will contain the whole new record including the autoincrement column:

{
   "success":true,
   "data":{
      "CategoryName":"Beer",
      "Description":"Beer and stuff",
      "CategoryID":272
   }
}

delete

Sample request URL:

curl -X POST "http://localhost:8086/api/v1.php?table=customers&action=delete&editid1=WOLZA"

Sample request URL with multiple key columns:

curl "http://localhost:8086/api/v1.php?table=order%20details&action=delete&editid1=10248&editid2=42"

Grouping in Charts

Previously in charts, you had to use GROUP BY in SQL query to display aggregated data like the number of orders per month. Many people were struggling with SQL queries like this and also you could not search or filter that data because of the use of the GROUP BY.

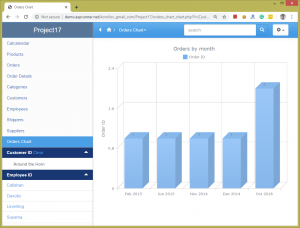
Now we added a much easier option for this. You can just leave the default SELECT * FROM ... query and on chart setup screen choose the group field. Here is how it looks in the generated application:

"OR" search

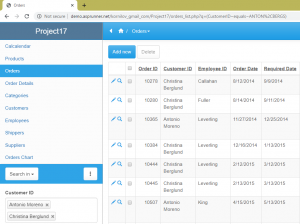
Also, a feature that was not available previously. Previously you had to add the same field twice or thrice to the search panel in order to implement the OR search. Now all you have to do is to make the search field a lookup wizard and enable multi-select on the search page. Now you can easily display orders that belong either to Customer 1 or to Customer 2 or to Customer 3. Configure CustomerID as a Lookup wizard, choose 'Different settings on each page' option, make it multi-select on the Search page, leave it Single select on Add/Edit pages.

There is an excellent video tutorial on YouTube that covers both grouping in charts and OR search.

Working with third-party REST API

$
0
0

In the current world situation, all countries track new and existing cases of COVID-19. Some countries provide an API to access the latest data. Here is an API provided by Hong Kong's department of health. Today we will learn how to display this data in our own application. Applies to version 10.4 of PHPRunner, ASPRunner.NET and ASPRunnerPro.

Creating the REST View

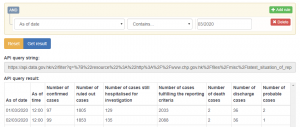
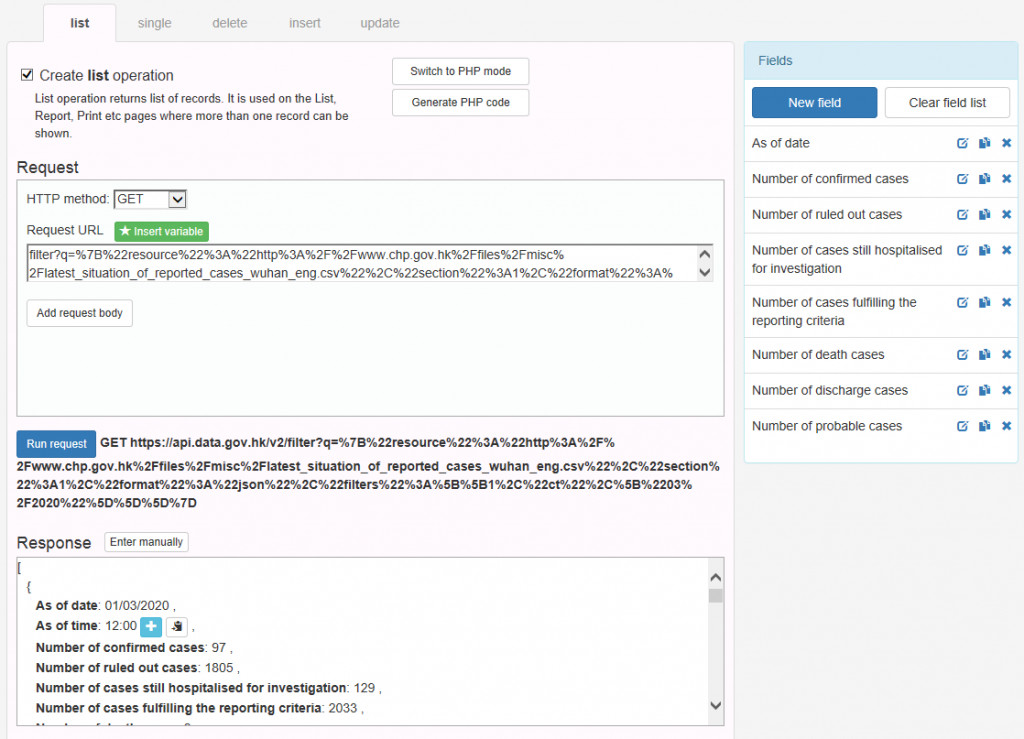
1. Lets see how we can display data for March 2020. We added a filter for 'As of date' field to show data that contains '03/2020' in this field (they use UK date format). Click 'Get result' and we will see both API query string and the data it returns.

2. Now, lets take a look at the URL:

https://api.data.gov.hk/v2/filter?q=%7B%22resource%22%3A%22http%3A%2F%2Fwww.chp.gov.hk%2Ffiles%2Fmisc%2Flatest_situation_of_reported_cases_wuhan_eng.csv%22%2C%22section%22%3A1%2C%22format%22%3A%22json%22%2C%22filters%22%3A%5B%5B1%2C%22ct%22%2C%5B%2203%2F2020%22%5D%5D%5D%7D

We can paste it to the web browser and get the same results in JSON fomat. Now it is the time to create a REST connection. The https://api.data.gov.hk/v2/ part of the URL is the main connection URL.

3. When setting up the REST View we use the rest of our URL. Now we can run the request, add fields and build the project.

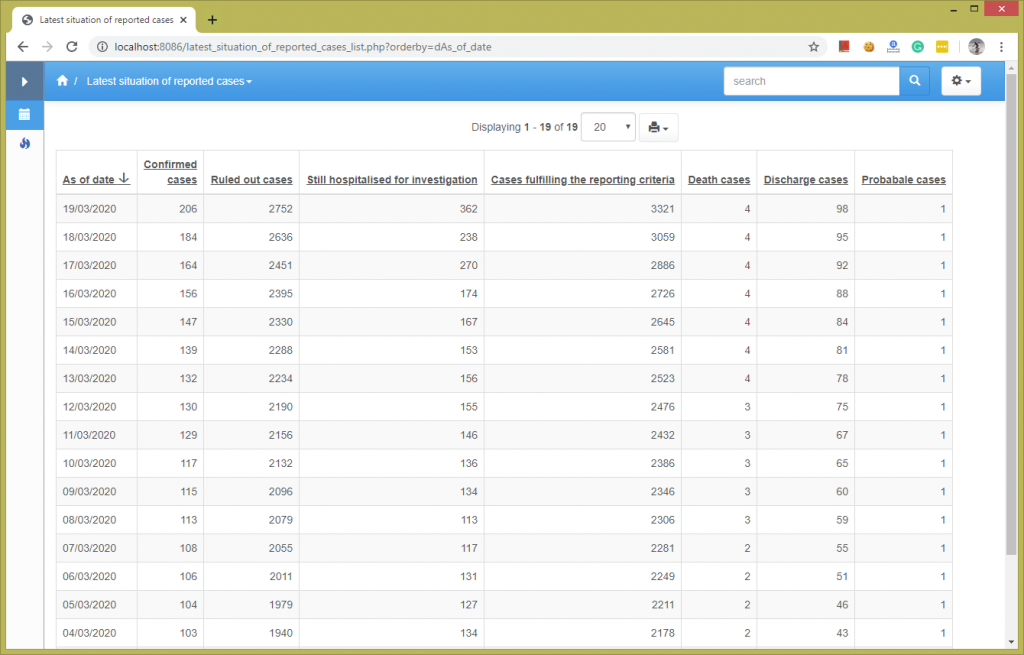
4. And this is how it looks in the web browser. I just shortened field labels to make it look better.

Creating the REST Chart

1. Now proceed to 'Datasource tables' screen, right click on our REST View and choose 'Add chart'. By default it uses the same REST API call and has access to the same dataset.

2. Now we proceed to the chart setup. It is fairly straightforward, just select a few fields to show on the chart.

3. There is one more thing before we are ready to test it in the web browser. Our chart will make more sense if data is sorted by the date. Since this REST API doesn't support sorting we will have to do this manually.

Proceed to the REST Chart 'Source' page, switch to 'PHP mode'. Most of the code is already generated for us, we just need to insert the following snippet:

if( !$command->order ) {
$command->order[] = array("column" => "As of date", "dir"=>"ASC" );
}

Here is how the complete code going to look:

$method = "GET";
$url = "filter?q=%7B%22resource%22%3A%22http%3A%2F%2Fwww.chp.gov.hk%2Ffiles%2Fmisc%2Flatest_situation_of_reported_cases_wuhan_eng.csv%22%2C%22section%22%3A1%2C%22format%22%3A%22json%22%2C%22filters%22%3A%5B%5B1%2C%22ct%22%2C%5B%2203%2F2020%22%5D%5D%5D%7D";
$url = RunnerContext::PrepareRest( $url );

//	do the API request
$response = $dataSource->getConnection()->requestJson( $url, $method );
if( !$response ) {
	//	something went wrong
	$dataSource->setError( $dataSource->getConnection()->lastError() );
	return false;
}

//	convert API result into recordset
$rs = $dataSource->resultFromJson( $response, true );

// apply search and order parameters
if( !$command->order ) {
$command->order[] = array("column" => "As of date", "dir"=>"ASC" );
}
$rs = $dataSource->filterResult( $rs, $command->filter );
$dataSource->reorderResult( $command, $rs );

//	apply pagination
$rs->seekRecord( $command->startRecord );
return $rs;

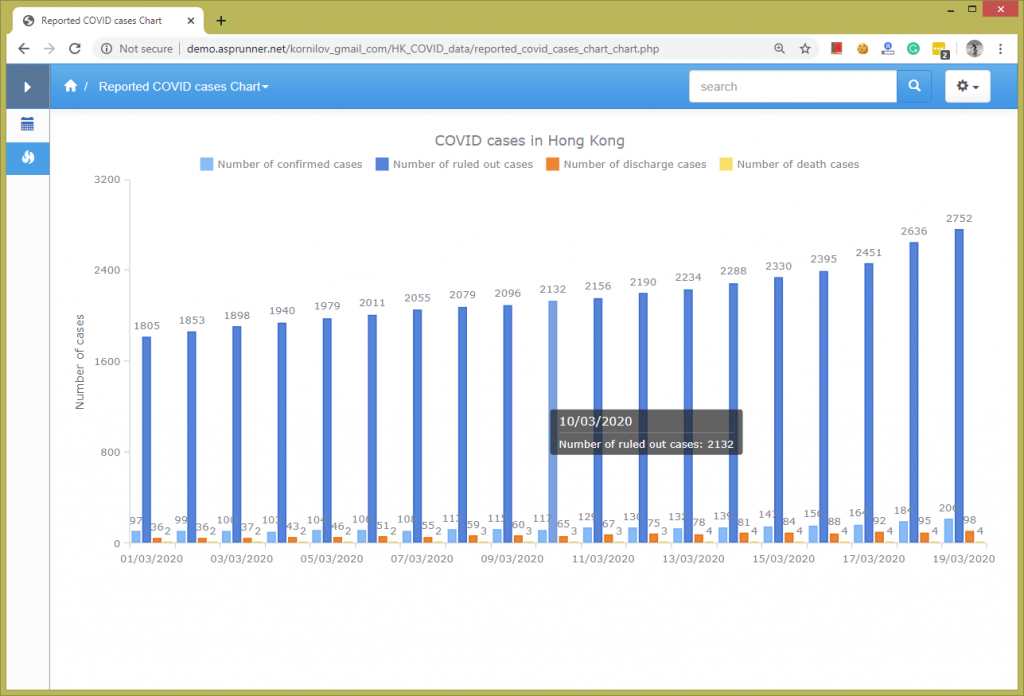
4. And this how it looks in the web browser.

Enjoy!


Using geolocation data in your web application

$
0
0

Knowing where your web applications users location is a useful feature, that can help you provide a better service. For instance, you can show them results that are tailored to their location or display their location on the map or convert latitude/longitude to a street address. There is a handy Geolocation API in Javascript that can provide the user's location, we just need to find the way to pass this data to the server-side and save it in session variables.

We want to get this data as soon as possible so some of the code needs to the added to the start page of your application, i.e. login page or menu page.

1. Javascript OnLoad event of the start page (login or menu)

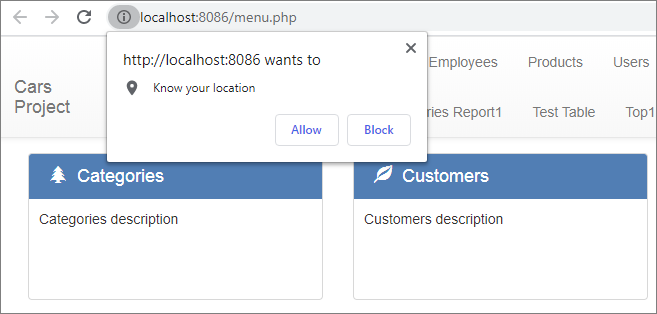
If we haven't acquired geolocation data yet and Geolocation API is supported by the web browser we will get latitude/longitude values and pass it via AJAX post to our application.

PHPRunner

if(!proxy.haveLocation){
    if (navigator.geolocation) {
        navigator.geolocation.getCurrentPosition(showPosition);
    }
    function showPosition(position) {
        $.post("menu.php",{
             lat:position.coords.latitude,
            lng:position.coords.longitude
        })
    }
}

ASPRunner.NET

if(!proxy.haveLocation){
    if (navigator.geolocation) {
        navigator.geolocation.getCurrentPosition(showPosition);
    }
    function showPosition(position) {
        $.post("menu",{
             lat:position.coords.latitude,
            lng:position.coords.longitude
        })
    }
}

The browser will ask user if they want to disclose their location.

2. BeforeDisplay event of the start page.

PHP

if($_SESSION["geoLatitude"] && $_SESSION["geoLongitude"])
    $pageObject->setProxyValue('haveLocation', true);

C#

if(XSession.Session["geoLatitude"] && XSession.Session["geoLongitude"])
    pageObject.setProxyValue ("haveLocation", true);

3. AfterAppInit event

This code processes the AJAX post and saves data in session variables.

PHP

if(postvalue("lat") && postvalue("lng")){
    $_SESSION["geoLatitude"] = postvalue("lat");
    $_SESSION["geoLongitude"] = postvalue("lng");
    exit();
}

C#

if(MVCFunctions.postvalue("lat") && MVCFunctions.postvalue("lng")){
    XSession.Session["geoLatitude"] = MVCFunctions.postvalue("lat");
    XSession.Session["geoLongitude"] = MVCFunctions.postvalue("lng");
    MVCFunctions.Exit();
}

Now, on any page, you can use session variables $_SESSION["geoLatitude"] and $_SESSION["geoLongitude"] (XSession.Session["geoLatitude"] and XSession.Session["geoLongitude"] in C#) to do something useful with it.

Hiding details table tab on the fly

$
0
0

Master-details is a very useful feature but the details table may clutter the UI. We have seen projects where people have more than a dozen details tables and it would be useful if we can hide some that are not relevant to the current master table record.

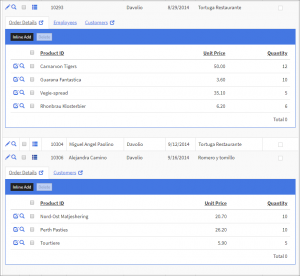
Let us take a look at this completely artificial example. A typical setup with Orders table as a master and Order Details, Employees, and Customers as details. We would like to hide the Employees table tab when OrderID is more than 10300.


$("[id^=details_]").bind("click", function(){

        // get ID of the current master table record   
	var id = $(this).attr("data-record-id"), res = false;

        // loop through all master table records on the page
	var allRecords = pageObj.getAllRecords();
	rem = false;
	$.each(allRecords, function(i, row){

        // If we found our record and value of OrderID is more than 10300
        // than we will remove the tab. This is where you can add your own condition
        if(row.recordId()== id && row.getFieldText("OrderID")>"10300")
            rem = true;
    });
        // actually removing the tab, 1 means second tab, 0 means first tab etc 
	if(rem) {
		$("#tabs-details_details_preview"+id).find("[data-tabidx=1]").remove();
	
  	        // uncomment the following line if you need to hide the first tab
		// $("#tabs-details_details_preview"+id").find("[data-tabidx=1]").find("a").click();
        }

});

This is pretty much it. This code will work in version 10.x or better of PHPRunenr, ASPRunner.NET and ASPRunnerPro. Enjoy!

Business templates

$
0
0

Business Templates are pre-built mini-projects that can quickly add some specific functionality to your projects like Calendar or ToDo List. This article will teach you how to become a Business Template guru.

Btw, here are top three templates of all times:

Calendar template DocManager template Quiz template
Document management template Quiz template

Installing templates and creating projects

Our software comes with ten free templates that are already pre-installed. Additional Templates that you purchase need to be installed to <Directory where ASPRunnerPro or PHPRunner or ASPRunner.NET installed>\templates\business. Once installed you can run the software and create a new project from one of the installed templates.

You will be prompted to select a database and after all required tables and code will be created and you can build and use your project right away.

Adding templates to existing projects

This is probably the most complicated topic. Imagine the situation, when both your project and the template you adding have their own login table. Our software will offer you to choose, what login table (Security Template) is to use but both options have their disadvantages. We'll show you how to add the template with its own login table to the project.

In this example, we will be adding DocManager template to the existing project.

1. Add DocManager template to project. Keep the existing project login table.

2. Start another instance of the software and create a new project using the same DocManager template. When prompted choose 'Use existing tables' option.

3. Proceed to the doc_users table, see what fields are there besides username and password fields. In our case those additional fields are email, usertype and name. Add the same fields to the login table in your main project. If such a field already exists then don't add it.

4. Proceed to DocMamager project Global events like AfterAppInit, AfterSuccessfulLofin, AfterSuccessfulRegistration etc, copy the code there and add it to respective events of your own project. Normally you can add new code to the beginning of the event, unless it contains a redirect to another page. The code with redirect should be placed to the end of the existing event code.

Now you can close the DocManager project (no need to save it), build your original project, and test it. In newer versions of our software we will perform most of these steps automatically.

You can also add more than one template to the project using the same approach.

Upgrading templates

To upgrade a template, remove the template tables from the project on the Datasource tables screen, then add the template to the project again.

Note: to avoid overwriting the existing tables with the template ones, all template tables and files have a unique prefix. For example, the tables of the 'Cars' project template have the 'cars' prefix.

1. Remove the tables of that template from the project by deselecting them on the left panel.
2. Add the template back to the project by clicking the Project button and selecting Add/manage business templates.

Removing the template from the project

1. Remove template tables from the project, similar to what is described in Upgrading templates.

2. Remove template specific code from common events like AfterAppInit, AfterSuccessfulLogin event etc. Normally template specific code is wrapped by respective comments to make it easier for you to locate it.

For instance, here is the code that Calendar control adds to AfterAppInit event.

// Calendar template - begin

global $calendarSettings;
global $calendarDatasourceTableNames;
$calendarSettings = array();
$calendarDatasourceTableNames = array();
			
include_once(getabspath("include/calendar_functions.php"));
include_once(getabspath("include/calendar_holidays.php"));
add_daysname();
$calendarDatasourceTableNames["calcalendar"] = "calcalendar";
calendar_init();
checkCalendarSettings();

// Calendar template - end

Using your own tables

All templates come with their own tables and all the code in the events expected certain field names in these tables. That being said, making templates use data from your own table is not an easy task but some templates, like Calendar, support this kind of flexibility. We are also working on making this kind of functionality available in other templates.

Other integration options

Create an entry in the Calendar or Invoice tables automatically.

Extensibility

Even though templates come with a lot of existing functionality each project is different and people want to customize it according to their needs. This is why we offer a bunch of custom hooks in newer templates. For instance, in ToDo List Template you can easily change the single card view or send an email after the new card is created. Make sure to check each individual template documentation to see al extensibility and customization options.

function prepareCard($data) {
// this function is executed when we prepare text to  be shown on the card
// $data - an array with card values from tocards table
// return value: text to show on the card
    $value=$data["cardname"];
		if ($data["duedate"]) {
				$value.="
Due date: ".date("M j, Y", strtotime($data["duedate"])); } return $value; } function afterCardCreated($cardid){ // executed after card is created // $cardid - id of the card (from todocards table) $data = array(); $keyvalues = array(); $data["cardcolor"] = DBLookup("select id from todocategories where name='Errands'"); $data["priority"] = "medium"; $keyvalues["id"] = $cardid; DB::Update("todocards", $data, $keyvalues ); }

Using templates to merge projects

If you need to merge two projects together you can save one of them 'as template' and then add this template to the second project.

What templates are available

Our software comes with ten free templates. There are also thirteen premium templates that can be purchased separately.

Free templates
Cars
Jobs
Sporting
Vacations
Knowledge Base
PayPal
Classifieds
Events
News
Real Estate

Premium templates
Calendar
Invoice
DocManager
Forum
Resource Calendar
PDFForms
ToDo List
Survey
Quiz
Shopping Cart
Members
MassMailer
EmailReader

If you have questions about templates that are not covered in this article feel free to post in comments.

Dynamic login page background

$
0
0

We have discussed the topic of making a beautiful login page in this post. What if we can take it to the next level automatically changing the login page background once a day? It is easier than you think.

We are going to use of Reddit forums where people post pictures of our beautiful planet. There are communities there for every taste: cute animal pictures, wallpapers, abandoned buildings, astronomy pictures so you can find something that fits your website theme. Here is how the sample login page looks.

CSS code

The following CSS code goes to Editor->Custom CSS section. It sets image named images/background.jpg as a background of the login page. It also pushes the login box a little bit down as it looks better this way with backgrounds like this.

body.function-login {
height:100%;
background:transparent url("../../images/background.jpg") no-repeat center center fixed;
background-size:cover;
}

body.function-login .r-panel-page {
position: absolute;
top: 40%;
left: 50%;
-moz-transform: translateX(-50%) translateY(-50%);
-webkit-transform: translateX(-50%) translateY(-50%);
transform: translateX(-50%) translateY(-50%);
}

Code to download a new image

The following code goes to AfterAppInit event.

PHP code:

	//The path and filename that you want to save the file to
	$fileName = "images/background.jpg";

	$download = false;
	// check if file exists and how old is it

	if (!file_exists($fileName)) {
		$download = true;
	} else {
		$time = filemtime($fileName);
		// previous file is more than 24 hours old?
		if ( time()-$time > 24*24*60 )
			$download = true;	
	}	

	if ($download) { 
	
		// JSON feed URL
		$url = "https://www.reddit.com/r/EarthPorn/hot.json?limit=1";
		 
		$session = curl_init();
		curl_setopt($session, CURLOPT_URL, $url);
		curl_setopt($session, CURLOPT_HEADER, false);
		curl_setopt($session, CURLOPT_RETURNTRANSFER, true);
		if(ereg("^(https)",$url)) curl_setopt($session,CURLOPT_SSL_VERIFYPEER,false);

		// get JSON feed
		$response = curl_exec($session);
		curl_close($session);

		if ($response) { 
			  
			// decode response and get the URL of the image
			$arr = json_decode($response);
			$url = $arr->data->children[0]->data->url; 
			
			//Download the image
			$downloadedFileContents = file_get_contents($url);
			if($downloadedFileContents === false)
				exit();
			 
			//Save the data using file_put_contents.
			file_put_contents($fileName, $downloadedFileContents);
		}
	}

How it works and additional considerations

First of all we check if the background image exists already. If it doesn't exist we should download one. If it exists and is older than 24 hours we should download the new one.

First we get the list of new posts of that subreddit. We actually only need the latest post and this is why we add limit=1 to the URL. If you need to get the feed of another subreddit, like wallpapers, here is the URL you can use:

https://www.reddit.com/r/wallpapers/hot.json?limit=1

Once we downloaded the feed to parse it, get the URL of the actual image, and download it too. Once downloaded we replace the previous images/background.jpg file with the new one. Since images are always in JPEG format here we do not need to worry about the file extension.

Note that this is a barebones code that doesn't take into account if picture vertical or horizontal, doesn't reduce image size if the image is too big etc. It

Do not forget to set WRITE permissions on the images folder. Also, if you use PHP, make sure that allow_url_fopen variable is set to on in php.ini.

Context help in your web applications

$
0
0

This article explains how you can implement context help in your PHPRunner or ASPRunner.NET application. Maybe you need to display some hints for users or a link to a more detailed page in the manual. If you ever checked PHPRunner or ASPRunner.NET live demo you probably noticed how it looks there:

We, of course, do not want to add those messages manually to every page. Instead, we will store all those messages in the database and display the relevant message based on what page we currently on.

1. Table to store messages

The following script is for MySQL:

CREATE TABLE `messages` (
  `id` int(11) NOT NULL,
  `pageName` varchar(100) COLLATE utf8mb4_bin DEFAULT NULL,
  `pageType` varchar(100) COLLATE utf8mb4_bin DEFAULT NULL,
  `value` text COLLATE utf8mb4_bin NOT NULL,
  `project` int(11) NOT NULL
) ENGINE=InnoDB DEFAULT CHARSET=utf8mb4 COLLATE=utf8mb4_bin;

ALTER TABLE `messages` ADD PRIMARY KEY (`id`);
ALTER TABLE `messages` MODIFY `id` int(11) NOT NULL AUTO_INCREMENT;

Here is how sample data in the messages table looks.

2. AfterAppInit event.

$page = preg_replace('/(\/|\.php)/i', '', substr($_SERVER["PHP_SELF"], 
   strripos($_SERVER["PHP_SELF"],"/")) );
$sym_pos = strripos($page,"_");
$selectData["pageName"] = $sym_pos?substr($page,0,$sym_pos):$page;
$selectData["pageType"] = $sym_pos?substr($page,$sym_pos+1):"";
$selectData["project"] = 1;
$record = DB::Select("messages", $selectData )->fetchAssoc();
$_SESSION["messages"] = "";
if( $record ) $_SESSION["messages"] = $record["value"];

Here we parse the current page URL to find the table name and page type ("list", "add" etc). We could have just stored the file name like "customers_list.php" but we'd like to use the same table for PHPRunner and ASPRunner.NET and ASPRunnerPro demos so we doing it this way.

The project field is not required if you only have a single project. We have multiple live demos so the following tells that we are working with Liev Demo 1.

$selectData["project"] = 1;

Once the message is retrieved we store it in the session variable $_SESSION["messages"] so we can later use it anywhere on the page.

3. Displaying the message

The easiest option is just to display it in the header. This is what we do in those live demos. Another option is to display it from the code snippet.

<?php 
print $_SESSION["messages"];
?>

4. Sample message HTML code

Here is HTML of the hint that is seen on the screenshot.

<DIV class="col-md-8 col-md-offset-2 alert alert-success info big-info">
<DIV class="col-md-6">
<ul>
<li>Preview with products</li>
<li>Columns grid layout on the List page</li>
</ul>
</DIV>
<DIV class="col-md-6">
<ul>
<li>Custom template - without search panel</li>
<li>Highlighting search results</li>
</ul>
</DIV>
</DIV>

You can do something else, i.e. display a link to the page in the manual.

Enjoy!

Show new records on the list page automatically

$
0
0

Let's imagine you have a web application where multiple users adding data at the same time i.e. a helpdesk application where end-users submit tickets and support staff needs to see new tickets as soon as possible. This article explains how to show new records on the page automatically without reloading the page. New records will be also highlighted to make them stand out.

Instructions

1. It makes more sense to sort data by ID descending so new data appears at the top. You can do that on the SQL Query screen.

2. We will be saving the current number of records in the session variable. There are other ways to tell that new records were added but in this article, we use the easiest option.

Code

List page: Before Display event

PHP

if(postvalue("a") === "check_new" ){
 $_SESSION["new_records"] = 0;
 if($pageObject->numRowsFromSQL > $_SESSION["current_count"]){
	$_SESSION["new_records"] = $pageObject->numRowsFromSQL - $_SESSION["current_count"];
 }
 print json_encode(array("action" => $_SESSION["new_records"] > 0?"update":""));
 exit();
}
$_SESSION["current_count"] = $pageObject->numRowsFromSQL;
$pageObject->setProxyValue("new_records",isset($_SESSION["new_records"])?$_SESSION["new_records"]:0);	
unset($_SESSION["new_records"]);

C#

dynamic action = MVCFunctions.postvalue("a");
if(action == new XVar("check_new")){
	XSession.Session["new_records"] = 0;
	if(pageObject.numRowsFromSQL > XSession.Session["current_count"]){
		XSession.Session["new_records"] = pageObject.numRowsFromSQL - XSession.Session["current_count"];
		
	}
	dynamic info = XVar.Array();
	info.InitAndSetArrayItem(XSession.Session["new_records"] > 0?"update":"", "action");
	MVCFunctions.Echo(MVCFunctions.my_json_encode((XVar)(info)));
	MVCFunctions.Exit();
}

XSession.Session["current_count"] = pageObject.numRowsFromSQL;
pageObject.setProxyValue("new_records",XSession.Session.KeyExists("new_records")?XSession.Session["new_records"]:new XVar(0));	
XSession.Session.Remove("new_records");

List page: Javascript Onload event

The autoreload variable tells if we need to reload the page automatically or just to display the message. true means reload the page automatically, false means just display the message.

You can customize the color of new records highlight and also the interval to check for new records. By default, it is set to ten seconds.

autoreload = false;
var new_row_color = "#FF7373";
var message = $("<div class='alert alert-success'>There is new data available. <a href=''>Reload page</a></div>");
if (proxy["new_records"] > 0) {
    var new_rows = pageObj.getAllRecords().splice(0, proxy["new_records"]);
    $.each(new_rows, function(index, row) {
        $("#gridRow" + row.row.id).css("background-color", new_row_color);
    })
}
function check_new() {
    $.get("", { a: "check_new" }, function(response) {
        var data = JSON.parse(response);
        if (data.action === "update") {
            if (autoreload) {
                window.location.reload();
            } else {
		$(".r-grid").before(message);
            }
        }
    });
}
var seconds = 10;
setInterval(check_new, seconds * 1000);

Add page -> After Record Added

If you use Inline Add to add new records add the following code to Add page: After Record Added event
PHP

if($inline){
    $_SESSION["current_count"]++;
}

C#

if(inline){
	XSession.Session["current_count"]++;
}

Password-protecting additional admin actions

$
0
0

Some businesses may require two people to confirm certain actions like big transactions may require a supervisor's approval. Another scenario - certain actions require entering the second password. This additional password can be changed daily and distributed among employees in the morning along with the secret handshake. Btw, the whole application doesn't need to be password-protected, you can add the password to a certain action.

In this article, we will show how to implement this additional password security feature. We will cover two scenarios here:
1. Password-protecting custom button
2. Password-protecting editing the field in inline mode


The code

1. Creating 'settings' table

This example is for MySQL. This SQL script creates the required table and columns and inserts the record with the password. The password by default is 'password'.

CREATE TABLE `settings` (
  `id` int(11) NOT NULL,
  `password` varchar(50) DEFAULT NULL
);

ALTER TABLE `settings`
  ADD PRIMARY KEY (`id`);

ALTER TABLE `settings`
  MODIFY `id` int(11) NOT NULL AUTO_INCREMENT;

INSERT INTO `settings` (`id`, `password`) VALUES (NULL, MD5('password'));

Room for improvement: use bcrypt instead of MD5 hashing.

2. AfterAppInit event code

The following code verifies the password and returns true or false in JSON format. If you use another table instead of 'settings' make sure to update the code accordingly.

PHP

if( postvalue("a") === "check_password" ){
	$db_password = DB::Query("select password from settings where id=1")->value(0);
	print json_encode( array("success" => ( $db_password === md5( postvalue("password") ) ) ) );
	exit();
}

C#

dynamic action = MVCFunctions.postvalue("a");
if(action == new XVar("check_password")){
	dynamic record;
	dynamic rs = DB.Select("settings", "id=1");
	record = rs.fetchAssoc();
	dynamic response = XVar.Array();
	response.InitAndSetArrayItem( (record["password"] == MVCFunctions.md5(MVCFunctions.postvalue("password")) ), "success");
	MVCFunctions.Echo(MVCFunctions.my_json_encode((XVar)(response)));
	MVCFunctions.Exit();
}

3. Password-protecting custom button

The following code goes to the button's ClientBefore event.

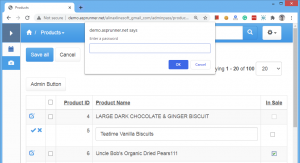
var password = prompt('Enter a password');
$.post("",{a:"check_password",password:password},function(response) {
	var result = JSON.parse(response);
	if(result.success){
        // here goes your additional code ClientBefore code if any
        // ...

		ajax.submit();
	}
	else{
		alert("Incorrect password");
	}
});
return false;

Room for improvement: use Dialog API instead of Javascript's prompt() function.

4. Password-protecting field changes

Enable Inline Edit for the table in question. Proceed to 'View as/Edit as' settings of the field you want to password-protect. Add Field event for 'change', choose 'AJAX code snippet' and add the following code to ClientBefore part.

var password = prompt('Enter a password');
$.post("",{a:"check_password",password:password},function(response) {
	var result = JSON.parse(response);
	if(!result.success){
		alert("Incorrect password");
		ctrl.setValue(ctrl.defaultValue);
	}
});
return false;

Enjoy!


Logging audio playback actions

$
0
0

If you have a website with a large number of audio files you might be interested in collecting stats like who listened to what and for how long and where they paused and started again etc. Turns out that collecting data like this and saving in the log table is easier than you would think.


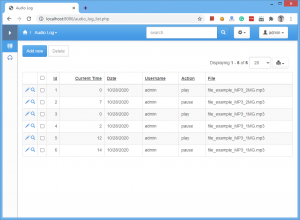
In this example we will be using MySQL database and here is how our log table looks like. If you enable security in your project then the "username" field will contain the username of the current user. "current_time" column stores the position of audio file where play or pause was pressed.

CREATE TABLE `audio_log` (
  `id` int(11) NOT NULL,
  `current_time` double DEFAULT NULL,
  `date` datetime DEFAULT current_timestamp(),
  `username` varchar(50) DEFAULT NULL,
  `action` varchar(50) DEFAULT NULL,
  `file` varchar(50) DEFAULT NULL
);
ALTER TABLE `audio_log`
  ADD PRIMARY KEY (`id`);
ALTER TABLE `audio_log`
  MODIFY `id` int(11) NOT NULL AUTO_INCREMENT;

Field with audio content needs to have 'View as' type Audio. The following code goes to Javascript OnLoad event of the page where Audio is played, i.e. to List or to View page.

$('audio').on("play pause",function(event) {
	send_data(event);
});

function send_data(audio_event) {
  // parsing audio attributes to get the audio file name
	var fileinfo = parse_file_props(audio_event.currentTarget.src);
	// building array with data to send to the server
  var data = {
		action:audio_event.type,
		file:fileinfo.file,
		current_time:audio_event.currentTarget.currentTime
	}
  // sending data to the server 
	$.get("",{a:"log",data:data});

}

function parse_file_props(src) {
	return src.split("?").pop().split("&").reduce(
        function(p,e){
            var a = e.split('=');
            p[ decodeURIComponent(a[0])] = decodeURIComponent(a[1]);
            return p;
        },
        {}
   );
}

And the following code goes to the BeforeProcess event of the page with audio files.

PHP:

if( postvalue("a") === "log" ){
	$data = postvalue("data");
	$data["username"] = Security::getUserName();
	DB::Insert("audio_log",$data);
	exit();
}

C#:

if( MVCFunctions.postvalue("a") == "log" ){
	dynamic data = MVCFunctions.my_json_decode(MVCFunctions.postvalue("data"));
	data.InitAndSetArrayItem(Security.getUserName(),"username");
	DB.Insert("audio_log",data);
	MVCFunctions.Exit();
}

Version 10.5

$
0
0

Version 10.5 of PHPRunner, ASPRunner.NET is here (ASPRunnerPro 10.5 will be available soon).

Please note this is a beta version and is not ready to be used in production yet. If you purchased PHPRunner, ASPRunner.NET or ASPRunnerPro less than one year ago you can download the registered version in your control panel. If you purchased more than one year ago you can also see upgrade links in the control panel.

If you are not eligible to get version 10.5 as a free upgrade here are trial version download links for you.

PHPRunner 10.5 trial version

ASPRunner.NET 10.5 trial version

What's new in this version

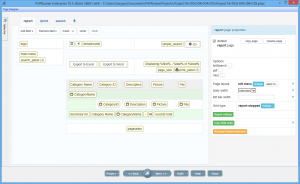
1. Reports editing in Page Designer


2. New Visual features (AdminLTE like).

3. Excel-like editing AKA Spreadsheet mode. Once this option is enabled the list page will load in Spreadsheet mode with all records editable. All changes to data will be saved automatically.

Also, there is an option to add a new record automatically once you click TAB while in the last column of the last record. Ideal for entering large amounts of data using the keyboard only.

4. OKTA authentication (will be ready in the final version)

5. Dialog API enhancements (lookups, date pickers, data validation )

6. SweetAlerts based popup confirmations popups.

7. Two-factor authentication now supports email and Google Authenticator.

There are options like make 2FA mandatory, "Remember this machine for two weeks" and also users can turn 2FA on and off on their profile page.

8. Better business templates integration, it will be easier to add multiple business templates to the project.
Also, we are working on revamping some built-in business templates look, see updated Cars template screenshot.

9. New mapping functionality ( Here.com, MapQuest.com, and also we will use free Google Maps Embed API for simple maps like 'View as' Map)

10. User profile page ( 2fa - phone, email, Google Authenticator (TOTP), profile picture)

11. Reorder records by drag and drop. This will not be available in the beta version but will be a part of the final version.

Analyzing incoming emails

$
0
0

As web developers, we deal with large amounts of data every day. Sometimes it helps to sit back and take a closer look at the data in hand and see what data is trying to tell.

Here, at Xlinesoft.com customer support is one of the most important parts of the business. We deal with a large number of emails and helpdesk tickets every day and, as a small weekend project, we decided to build a few charts to analyze those emails. We are sharing these results here and hoping that it can provide you or your clients with some insights.

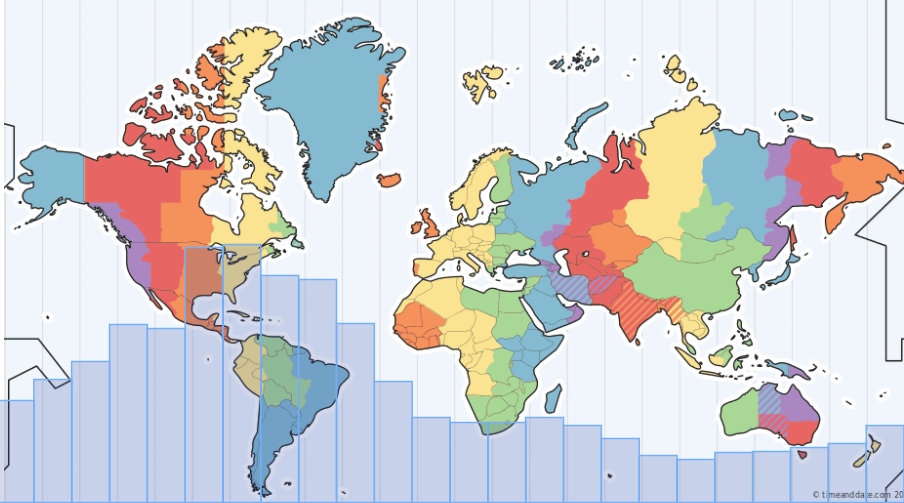
First of all, we analyzed incoming support requests by the hour of the day. There is no surprise that 9am to 1pm US Eastern time is the busiest time of them all as emails from Europe and tickets from both East and West coast are coming in. We grouped those emails by the hour of the day and placed them on the world map with timezones for easy digesting.


Here is the SQL query that we have used to pull and group data. Our local time is US Eastern Time (GMT +5) and we needed to adjust data in order to match it with timezones. This syntax applies to SQL Server.

select
DATEPART(HOUR, dateadd(hour,5,created)) AS [hour],
COUNT(*) AS [count]
FROM dbo.tblEmail
WHERE (direction = 1) AND (created > '2019-01-01 00:00:00')
GROUP BY DATEPART(HOUR, dateadd(hour,5,created))
ORDER BY DATEPART(HOUR, dateadd(hour,5,created)) desc 

And also here are chart settings. Here we add a background image, remove the padding between bars, set the Y-axis scale to about 50% so bars do not completely cover the map, and also make chart bars semi-transparent. This code goes to ChartModify event.

chart.background().fill({
  src: "images/timezones.png",
  mode: "fit"
});
chart.barGroupsPadding(0);
chart.yScale().maximum(8000);
chart.yAxis().enabled(false);
var series1 = chart.getSeriesAt(0);
series1.normal().fill("#004499", 0.2);

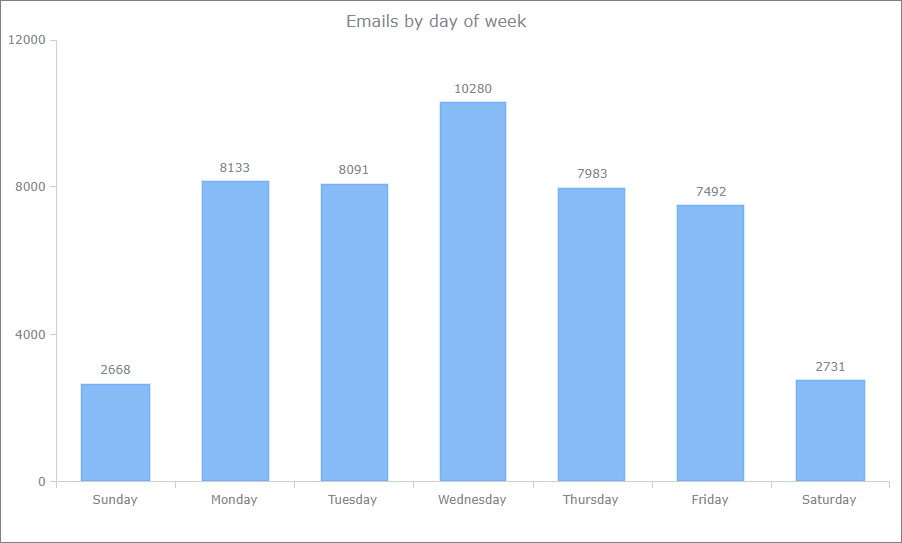
The second chart represents incoming emails by the day of the week. I was a bit surprised to see that Wednesday is the busiest day of the week. Go figure.

How can you use this info? You probably noticed, that most of our newsletters come out Thursday around lunchtime. We feel that most people are done with most of their work for the week and are more likely to read something else.

And here is the SQL query we used to build this chart. All other chart settings are pretty much default ones.

select
datepart(w, created) AS downumber,
DATENAME(w, created) AS dow,
COUNT(*) AS [count]
FROM dbo.tblEmail
WHERE (direction = 1) AND (created > '2019-01-01 00:00:00')
GROUP BY datepart(w, created), DATENAME(w, created)
ORDER BY datepart(w, created)

New security providers in version 10.6

$
0
0

Enterprise Edition of PHPRunner and ASPRunner.NET provides Active Directory authentication option. It is a useful feature but it has some restrictions, for instance, you cannot use a hybrid database/AD approach where some users will use Active Directory login and some others will have their usernames and passwords stored in the database.

This changes in version 10.6 where Active Directory is no longer a replacement for database-based login but a supplement. Active Directory is now considered a "security provider" and works the same way as "Login via Google" or "Login via Facebook". We are also adding new security providers like OpenID, SAML, AzureAD and Okta.

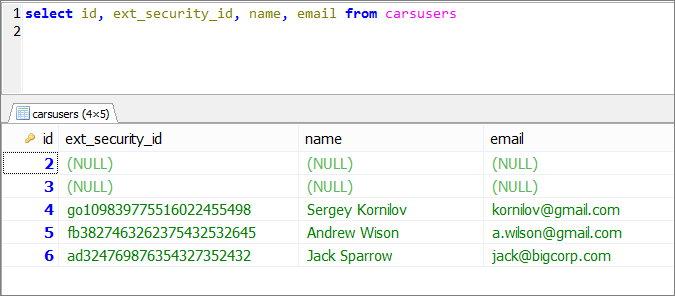
This is how it works on the backend side. If you have used "Login via Google" or "Login via Facebook", you should be already familiar with this concept. When user logs in via a third-party security provider we create a record in the users table with a unique id that for Facebook starts with fb, for Google it starts with go, and for Active Directory that prefix will be ad.


So, everyone who logged via AD will have a corresponding record in the login table. How is this useful? The question we get frequently is "will this work with Active Directory", for instance, will the Chat template work if users are in the AD? The answer is no, YES! Since all users logged via AD now added to the login table they will be treated the same way as database users.

Database-based dropdowns with Dialog API

$
0
0

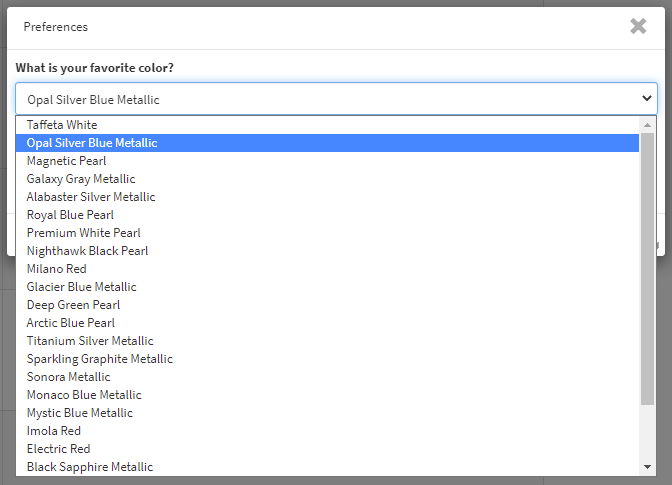
Quite a few people asked how to extend Dialog API by adding dropdown boxes populated by the database content. Since Dialog API is Javascript based there will be a little trick that would help us retrieve the data from the database on the server-side and pass it to Javascript.

Final result:

Let's take a look at the sample Dialog API code with the dropdown:

return Runner.Dialog( {
       title: 'Preferences',
       fields: [{
               name: 'color',
           type: 'lookup',
                 value: 2,
         options:  
                 [
                 [1,'red'],
                 [2,'green'],
                 [3,'yellow']
                 ]
      }],
       ok: 'Save',
       cancel: 'Cancel',
beforeOK: function( popup, controls ) {
swal('Success', 'Selected color: ' + controls[0].val(), 'success');
}
});

As you can see, we hardcode data in the lookup wizard, passing a two-dimensional array (id and value for each entry).

options:  
[
   [1,'red'],
   [2,'green'],
   [3,'yellow']
]

Now let's do our magic. The following code goes to the BeforeDisplay event of the page where we will be using Dialog API.

PHP code:

$lookup = array();
$rs = DB::Query("select id, color from carsbcolor");
while( $data = $rs->fetchAssoc() )
{
$row = array();
$row[] = $data["id"];
$row[] = $data["color"];
$lookup[] = $row;
}
$pageObject->setProxyValue("lookup", $lookup);

C# code:

dynamic lookup = XVar.Array();
lookup = XVar.Clone(XVar.Array());
rs = XVar.Clone(DB.Query(new XVar("select id, color from carsbcolor")));
while(XVar.Pack(data = XVar.Clone(rs.fetchAssoc())))
{
	row = XVar.Clone(XVar.Array());
	row.InitAndSetArrayItem(data["id"], null);
	row.InitAndSetArrayItem(data["color"], null);
	lookup.InitAndSetArrayItem(row, null);
}
pageObject.setProxyValue(new XVar("lookup"), (XVar)(lookup));
return null;

You can see that we execute a SQL query, loop through results, populate an array with data and then pass to Javascript using setProxyValue function.

Now here is the updated Dialog API code.

return Runner.Dialog( {
       title: 'Preferences',
       fields: [{
                name: 'color',
		label: 'What is your favorite color?',
		type: 'lookup',
                value: 2,
		options: proxy['lookup']
		}],
       ok: 'Save',
       cancel: 'Cancel',
beforeOK: function( popup, controls ) {
swal('Success', 'Selected color: ' + controls[0].val(), 'success');
}
});

This code is even cleaner now than the previous version. Instead of the hardcoded dropdown entries we just use proxy['lookup'] and voilà!

Enjoy.

Viewing all 95 articles
Browse latest View live