Quantcast
Channel: PHP – Xlinesoft Blog
Viewing all 95 articles
Browse latest View live

Zip and download selected files

$
0
0

This tutorial covers a simple but common need. You have a page with a list of files and want your users to select and download multiple files at once. In this example, we will use the upload field that can store multiple files at once.


In Page Designer proceed to the List page and add a Custom button.

ClientBefore event

In this event, we simply check if any records were actually selected and display a message if there is nothing to process.

if ($("[name^=selection]:checked").length<1) {
  swal("Select at least one record");
  return false;
}

Server event

In this event, we build the list of files and zip them up. We save the zip file in the temporary folder (templates_c) and pass the name of the file to Client After event. If something didn't work we just pass the error message to the same event.

PHP code

$filesArray = array();
while($record = $button->getNextSelectedRecord()){
	$files = my_json_decode($record["files"]);
	foreach($files as $f){
		$filesArray[] = $f;
	}
}
$zip = new ZipArchive();
$filename = "templates_c\\DownloadSelected".date("YmsHis").".zip";
$result["error"] = "";
$result["name"] = $filename;
if($zip->open(getabspath($filename), ZipArchive::CREATE)!==TRUE) {
    $result["error"] = "Cannot create zip file";
}

foreach($filesArray as $v)
	$zip->addFile(getabspath($v["name"]),$v["usrName"]);

Client After event

Here we display the error message if any. If there is no error message we simply redirect the user to the zip file and it will be downloaded automatically. Then we clear all the checkboxes so the page is ready for the next step.

if(result["error"]!="")
	ajax.setMessage(result["error"]);
else{
	location.href=result["name"];
	$("[name^=selection]").each(function(){
		$(this).prop("checked","");
	});
}

Building secure low-code web applications

$
0
0

Low-code software builders will take off your hands most boring and repetitive tasks, which includes the security of your web application. Apps, created by PHPRunner and ASPRunner.NET follow all the security standards and secure out of the box. Your projects will be protected from SQL injection, XSS, CSRF, and more. If you'd like to know more about the most common web application vulnerabilities check OWASP Top Ten Security Risks. In this article, we will discuss additional security measures that are not directly related to the generated code but nevertheless are extremely important. If you ever need to build a public web application you need to go through this checklist and make sure your application complies.

1. Location of file-based database

If you use a file-based database like MS Access ( you should not ), make sure that the database file is not accessible directly via the internet. The best option is to place it outside of the website root folder. Otherwise, an attacker can eventually guess the location and name of your database and download it.

2. Location of uploaded files folder

The same applies to uploaded files, the best option is to use a folder, that is not directly accessible via the internet. In PHPRunner and ASPRunner.NET for this purpose, we use the 'Absolute path' option while specifying the path to the upload folder.

3. Use HTTPS

This is an extremely common requirement these days, some web browsers won't even let you open an HTTP website. You can even use free SSL certificates provided by Let's Encrypt.

4. Use all the latest versions of all server software

If you run your own web server, make sure that all the software is upgraded to the latest versions. This is especially true for any public-facing software like IIS, Apache, PHP and ASP.NET.

5. Password hashing

Turn on password encryption. If your database ever gets compromised, attackers won't be able to see users' passwords. This may prevent unauthorized access to other websites if users do not follow the "separate password for each website" practice.

6. Use Two-Factor-Authentication

This is also now a standard for most websites that store any potentially sensitive data. PHPRunner and ASPRunner.NET support 2FA via SMS, email, and apps like Google Authenticator. Enable 2FA in the software and encourage users to enable and use it.

7. Data encryption

Encrypt sensitive data in the database like social security numbers, addresses, birth dates, etc. If hackers ever get access to the database they won't be able to see the encrypted data, unless they also have access to the encryption key.

Data Encryption is a part of Enterprise Edition of PHPRunner and ASPRunner.NET.

8. Properly configure access permissions in the software

This is kind of obvious but it made OWASP Top Ten list. Make sure that each user and user group only has access to those pages and data that they are allowed to see. For this purpose, in PHPRunner and ASPRunner.NET use User Group Permissions and Advanced Security options like "Users can see and edit their own data only".

9. Turn off detailed error messages

Detailed error messages can reveal important info like file names, table and field names etc. Turning detailed error messages off can be done in IIS settings for ASPRunner.NET and in PHP settings for PHPRunner. Also in the software itself choose to display a generic error message.

10. Prohibit remote access to your database

Make sure that your database is only accessible locally, from your web server. Opening the remote access invites brute force attacks and also increases the load on your database. Setup firewall rules that would prohibit remote connections.

For development purposes, use a local copy of your database.

11. Prevent SQL injection in your own code

While all the core code generated by PHPRunner and ASPRunner.NET is fully protected from the SQL injection, you need to take care of this in the code you add to events. For this purpose, you can use PrepareSQL function that will take care of this.

$sql = DB::PrepareSQL("insert into log (lastname) values (':1')", $values["name"]);
DB::Exec( $sql );

12. Avoid storing sensitive data on your database when possible

For instance, instead of storing credit card info in your own database use a service like Stripe to process credit cards. This way credit card info never touches your server and you do not need to worry about PCI compliance which is a major pain on its own and an overkill for most projects.

Testing for vulnerabilities

How to test for vulnerabilities and how to interpret the results? Most companies use a vulnerability scanner to assess their web project's security. The most known products in this area are Acunetix and HCL AppScan (formerly IBM AppScan). These products will test all the pages of your web application against known vulnerabilities and create a report listing everything they found.

It is important that developers and the team that runs the vulnerability scanner work together to interpret the results properly. Let me give you an example. There is a vulnerability called "blind injection" (there in fact multiple versions of it like blind LDAP inject, blind SQL injection etc). The idea is to send a different set of request parameters to a certain page and your app should not indicate that parameters were and should return exactly the same output. The idea is not to provide any feedback and make parameter guessing more difficult.

One of the customers was running a vulnerability scanner against a PHPRunner app. First, the scanner executes a normal load of the list page. Then it adds a random parameter to that list page call and runs it again. The output was different and the scanner marks it as "critical vulnerability". Turns out, they ran the vulnerability scanner against a live database that was constantly updated and the difference between the two requests was just a number of records in the database table as someone just added a new record between these two tests. This is why it is important to interpret the results properly.

Working with Airtable’s REST API

$
0
0

Airtable is a very popular and easy-to-use "cloud database". It is basically an online spreadsheet on the web that provides tons of integrations with other services. While most web developers prefer to use a real database as a backend of their web application your clients may appreciate it if you can also pull data from their AirTable's spreadsheet.


In this article, we will show how to connect to Airtable's REST API, retrieve data and even update, delete and create new records.

Airtable Account setup

I assume that you already created an Airtable account and uploaded some data there. Proceed to the Airtable Account page and create an API key.

Then proceed to the API page. It will offer you to choose a workspace and will take you to the API manual where you can see all your tables, sample requests, and even the sample results.

PHPRunner/ASPRunner.NET setup

Now is the time to set this connection up in your favorite web application builder.

REST API connection

URL of the workspace can be found on Airtable API page. API key can be found on the Account page. Make sure to prepend the API key with "Bearer " as shown on the screenshot.

List

List page setup is very easy. Simply specify your table name ("base" name in Airtable's lingo) in the Resource box and you can run the request right away. Make sure to add all the required fields to the list of fields by clicking the '+' icon. Make sure to add the id column, Airtable creates it for you automatically and it is required for all view/edit/delete operations.

At this point, we would also suggest proceeding to 'Pages' screen in PHPRunner/ASPRunner.NET. Select id as a key column name and enable functions like View/Edit/Add/Delete.

Single

Single record configuration is also very simple, just change the resource to Customers/:{keys.id}. Just make sure to use your table name instead of "Customers".

Delete

Also straightforward, use HTTP method DELETE and Customers as a Resource.

Insert

Unfortunately, insert and update operations will require some coding. Airtable can insert/update multiple records at once, which is nifty, but the format of the JSON request is custom and we have to format the data manually.

For the insert operation, set HTTP method to POST, click 'Generate PHP (C#) code' and switch to PHP mode. Make sure to replace field names like ContactName and CompanyName with your own field names.

PHP code

$method = "POST";
$url = "Customers";
//	replace variables in the URL
$url = RunnerContext::PrepareRest( $url );
//	prepare request body
$body = array();
$body[] = array( "name" => "Content-Type", "value" => "application/json", "location" => "header", "skipEmpty" => true);
$body = $dataSource->preparePayload( $body );
$jsonBody =  array ( "fields" => array( 
    "ContactName" => RunnerContext::PrepareRest( ":{ContactName}", false ), 
    "City" => RunnerContext::PrepareRest( ":{City}", false ), 
    "CompanyName" => RunnerContext::PrepareRest( ":{CompanyName}", false ) 
) );
//	do the API request
$response = $dataSource->getConnection()->requestJson( $url, $method, $jsonBody, $body["header"], $body["url"] );
global $restResultCache;
$restResultCache = array();
if( $response === false ) {
	//	something went wrong
	$dataSource->setError( $dataSource->getConnection()->lastError() );
	return false;
}
return true;

C# code

dynamic body = XVar.Array(), jsonBody = null, method = null, url = null, var_response = null;
method = new XVar("POST");
url = new XVar("Customers");
url = XVar.Clone(RunnerContext.PrepareRest((XVar)(url)));
body = XVar.Clone(XVar.Array());
body.InitAndSetArrayItem(new XVar("name", "Content-Type", "value", "application/json", "location", "header", "skipEmpty", true), null);
body = XVar.Clone(dataSource.preparePayload((XVar)(body)));
jsonBody = XVar.Clone(new XVar("fields", new XVar("ContactName", RunnerContext.PrepareRest(new XVar(":{ContactName}"), new XVar(false)), "City", RunnerContext.PrepareRest(new XVar(":{City}"), new XVar(false)), "CompanyName", RunnerContext.PrepareRest(new XVar(":{CompanyName}"), new XVar(false)))));
var_response = XVar.Clone(dataSource.getConnection().requestJson((XVar)(url), (XVar)(method), (XVar)(jsonBody), (XVar)(body["header"]), (XVar)(body["url"])));
GlobalVars.restResultCache = XVar.Clone(XVar.Array());
if(XVar.Equals(XVar.Pack(var_response), XVar.Pack(false)))
{
	dataSource.setError((XVar)(dataSource.getConnection().lastError()));
	return false;
}
return true;

Update operation

Basically, the same thing as an insert operation, but the HTTP method needs to be set to PATCH.

PHP code

$method = "PATCH";
$url = "Customers/:{id}";
//	replace variables in the URL
$url = RunnerContext::PrepareRest( $url );
//	prepare request body
$body = array();
$body[] = array( "name" => "Content-Type", "value" => "application/json", "location" => "header", "skipEmpty" => true);
$body = $dataSource->preparePayload( $body );
$jsonBody =  array ( "fields" => array( 
    "ContactName" => RunnerContext::PrepareRest( ":{ContactName}", false ), 
    "City" => RunnerContext::PrepareRest( ":{City}", false ), 
    "CompanyName" => RunnerContext::PrepareRest( ":{CompanyName}", false ) 
) );
//	do the API request
$response = $dataSource->getConnection()->requestJson( $url, $method, $jsonBody, $body["header"], $body["url"] );
global $restResultCache;
$restResultCache = array();
if( $response === false ) {
	//	something went wrong
	$dataSource->setError( $dataSource->getConnection()->lastError() );
	return false;
}
return true;

C# code

dynamic body = XVar.Array(), jsonBody = null, method = null, url = null, var_response = null;
method = new XVar("PATCH");
url = new XVar("Customers/:{id}");
url = XVar.Clone(RunnerContext.PrepareRest((XVar)(url)));
body = XVar.Clone(XVar.Array());
body.InitAndSetArrayItem(new XVar("name", "Content-Type", "value", "application/json", "location", "header", "skipEmpty", true), null);
body = XVar.Clone(dataSource.preparePayload((XVar)(body)));
jsonBody = XVar.Clone(new XVar("fields", new XVar("ContactName", RunnerContext.PrepareRest(new XVar(":{ContactName}"), new XVar(false)), "City", RunnerContext.PrepareRest(new XVar(":{City}"), new XVar(false)), "CompanyName", RunnerContext.PrepareRest(new XVar(":{CompanyName}"), new XVar(false)))));
var_response = XVar.Clone(dataSource.getConnection().requestJson((XVar)(url), (XVar)(method), (XVar)(jsonBody), (XVar)(body["header"]), (XVar)(body["url"])));
GlobalVars.restResultCache = XVar.Clone(XVar.Array());
if(XVar.Equals(XVar.Pack(var_response), XVar.Pack(false)))
{
	dataSource.setError((XVar)(dataSource.getConnection().lastError()));
	return false;
}
return true;

Version 10.6

$
0
0

The beta version PHPRunner and ASPRunner.NET 10.6 is here!

Download links:
PHPRunner 10.6 beta
ASPRunner.NET 10.6 beta

What's new in this version

1. New security providers in version 10.6

New security providers: Azure AD, OKTA, SAML, OpenID. An option to combine multiple security providers i.e. you can use Active Directory together with database-based security.


2. Session expiration control

Non-expiring sessions, control over session expiration time, session expiration warning.

3. Visual improvements in version 10.6

Easily select a background image for any page. New layouts for Login and Register pages. A number of preinstalled images to choose from.

4. Dashboards API

Not yet included in this beta. Access any dashboard table or other object from API

5. HTML email templates (built-in and via API)

Applies to both built-in emails and emails that you can send from the events code.

6. RTL support in PDF

Now right-to-left text can be properly exported to PDF.

7. PHP only functionality

- Switch to PHPSpreadSheet for Excel export
- PHP 8.0 support

8. Upload files to cloud providers

Not yet included in this beta: an option to upload files to cloud storage providers like Amazon S3, Google Drive, Dropbox, OneDrive etc.

9. Notifications API

Not yet included in this beta: Notifications API (notifications icons on the toolbar)

10. AnyChart print/export/save as image

Not yet included in this beta.

Providing access to web application via unique link

$
0
0

Some web applications need to provide quick access to certain pages or documents. For instance, you can share a file via such a link or send a link to an invoice to be paid to your customer like the one on the screenshot below.

Let's see how you can implement this kind of link in your own project. The key is to create add a new text field to the table with invoices or documents that will store a long unique record identifier which will take a long time to guess. For practical reasons, this can be varchar(100) text field. In our example, this field name will hash.

And here is the sample URL that will provide the access to a single invoice:

invoices_view.php?hash=4f92e96540bc661ffaf9e63245342c486ca9e19

This is a two-step process. First, when we create a new record, we also need to populate the hash field with some unique value. And second, when someone opens a link like this, we

1. Populate hash field

In BeforeAdd event you can use the code like this:

PHP

$values["hash"] = generatePassword(50);

C#

values["hash"] = CommonFunctions.generatePassword(50);

There are many ways to generate a long random string, we use the built-in Runner's function generatePassword() but you can use any other method.

2. Process hash value when someone opens the link

In our example we provide access to the View page, so the code below needs to go to View page: BeforeProcess event. Make sure to use the correct table and field names like invoices and id.

PHP:

// hash is required for the GUEST user
if ( Security::isGuest() && !postvalue("hash") ) 
{
		echo "the hash number is required";	
		exit();
} 
	
if (postvalue("hash"))
{
	$data["hash"] = postvalue("hash");
	$rs = DB::Select("invoices", $data );
	$record = $rs->fetchAssoc();
	
	if(!$record)
	{
		echo "The hash number is incorrect";	
		exit();
	}
	
	$keys = array();
	$keys["id"] = $record["id"];
	$pageObject->setKeys( $keys );		
}

C#:

if((XVar)(Security.isGuest())  && (XVar)(!(XVar)(MVCFunctions.postvalue(new XVar("hash")))))
	{
		MVCFunctions.Echo("the hash number is required");
		MVCFunctions.ob_flush();
		HttpContext.Current.Response.End();
		throw new RunnerInlineOutputException();
	}
	if(XVar.Pack(MVCFunctions.postvalue(new XVar("hash"))))
	{
		data.InitAndSetArrayItem(MVCFunctions.postvalue(new XVar("hash")), "hash");
		rs = XVar.Clone(DB.Select(new XVar("invoices"), (XVar)(data)));
		record = XVar.Clone(rs.fetchAssoc());
		if(XVar.Pack(!(XVar)(record)))
		{
			MVCFunctions.Echo("The hash number is incorrect");
			MVCFunctions.ob_flush();
			HttpContext.Current.Response.End();
			throw new RunnerInlineOutputException();
		}
		keys = XVar.Clone(XVar.Array());
		keys.InitAndSetArrayItem(record["id"], "id");
		pageObject.setKeys((XVar)(keys));
	}
	return null;

This is it, you can now send your users links to individual invoices that they can access without logging in.

Working with Google Drive REST API

$
0
0

In this article, we'll show you how to retrieve a list of files from Google Drive via REST API and display those files in your PHPRunner or ASPRunner.NET application. This is how it looks in the generated application. The list of files is retrieved from Google Drive and displayed in your own application. In this test app, we only implemented search and view functionality, but adding and deleting files can be done as well.


1. Create API credentials in Google Cloud console

Proceed to Google Cloud console. Under APIs & Services -> Credentials click '+ Create Credentials'. Choose 'OAuth client ID' option. On the next screen choose 'Web application' as Application Type.

Once OAuth client is created copy ClientID and Client Secret, you are going to need them to create a REST API connection in PHPRunner or ASPRunner.NET.

In Oauth Client properties add Authorized redirect URIs. For local testing use:

PHPRunner

http://localhost:8086/oauthcallback.php

ASPRunner.NET

http://localhost:8086/oauthcallback

For production use:

PHPRunner

https://server.com/path/oauthcallback.php

ASPRunner.NET

https://server.com/path/oauthcallback

2. Enable Google Drive API

Under 'Library' find 'Google Drive API', click it and then click 'Enable'.

2. Create REST API connection

Proceed to PHPRunner or ASPRunner.NET and add a new REST API connection to your project. Choose 'OAuth 2.0 - User' as the authorization method.

Paste your saved Client ID and Client Secret there. The rest of the settings should be as specified below.

Authorization URI

https://accounts.google.com/o/oauth2/v2/auth

Access token URI

https://oauth2.googleapis.com/token

Scope

https://www.googleapis.com/auth/drive.readonly

More info: Google Drive API reference

3. Enable List operation

This is what you need to add to the Resource box:

/files?<?q=name%20contains%20':{all_field_search}'?>

4. Enable Single operation

This is what you need to add to the Resource box:

/files/:{filter.id}?fields=*

This is pretty much it. Once you build and run your application you will be presented with a Google Account login window. You can logon or choose one from your Google Accounts once once you are in you will see a list of files stored on your Google Drive.

Providing temporary access to your application

$
0
0

Let's say you need to provide users temporary access to your application. You create a user, set their access to 'temporary' and after 24 hours they should not be able to log on to your application. And, of course, you need this to happen automatically.

1. Add two more fields to the login table.

access - varchar(50). This field will store values like "temporary" or "inactive". It can be left empty for existing users.

temporary_access_starts - datetime. Indicates when the temporary access starts.

2. Add access field to Add/Edit pages of the login table. Set 'Edit as' type to 'Lookup wizard' and add two hardcoded values there: "temporary" and "inactive". Now the admin can create users with temporary access and make them inactive manually.

3. Login table -> Add page -> Before Record Added event

Here we simply initialize temporary_access_starts with the value of the current date/time.

PHP code:

if($values["access"] == "temporary"){
	$values["temporary_access_starts"] = date("Y-m-d H:i:s"); ;
}
return true;

C# code:

if(values["access"] == "temporary")
{
	values["temporary_access_starts"] = CommonFunctions.date(new XVar("Y-m-d H:i:s"));
}
return true;

4. Login Page -> BeforeLogin event

PHP code:

$user = DB::Select("users", array("username" => $username))->fetchAssoc();
if ($user && $user["access"] == "inactive") {
    return false;
}
if ($user  && $user["access"] == "temporary") {
    $date_cur = date_create_from_format('"Y-m-d H:i:s"', date('"Y-m-d H:i:s"'));
    $date_end_access = date_create_from_format('"Y-m-d H:i:s"', date('"Y-m-d H:i:s"', strtotime($user["temporary_access_starts"])));
    $diff = date_diff($date_cur, $date_end_access);
    // >24 hours
    if ($diff->h > 24) return false;
}
return true;

C# code:

dynamic user = XVar.Array();
user = XVar.Clone(DB.Select(new XVar("users"), (XVar)(new XVar("username", username))).fetchAssoc());
if((XVar)(user)  && (XVar)(user["access"] == "inactive"))
{
	return false;
}
if((XVar)(user)  && (XVar)(user["access"] == "temporary"))
{
   DateTime startTime = DateTime.Now;
   DateTime endTime = Convert.ToDateTime(user["temporary_access_starts"].ToString());
   TimeSpan span = endTime.Subtract ( startTime );
   if(span.Hours > 24) {
      return false;
   }
}
return true;

Version 10.7 beta

$
0
0

The beta version of PHPRunner and ASPRunner.NET 10.7 is here! Trial version download links:

The final version should be ready in two-three weeks.

Download PHPRunner 10.7 beta version

Download ASPRunner.NET 10.7 beta version

This new version features the following improvements:
1. Files upload to cloud providers: Google Drive, OneDrive, Amazon S3. Dropbox and a couple of other services will be supported a bit later.
2. Notification API
3. Visual improvements: new register page, dashboards appearance options. Some work is still being done in this area.

Let's dig into new functionality.

Files upload to cloud providers

When you set 'Edit as' type of the field to File/Image you now have an option to choose one of the cloud storage options.


Google Drive

Refer to this article that explains how to create an app in Google Cloud Console and get OAuth Client ID and OAuth Client Secret. Folder ID is optional. If you do not specify it, files will be uploaded to the root folder.

To find the folder id proceed to that folder in Google Drive in your web browser. The URL may look like this:

https://drive.google.com/drive/u/3/folders/0B-9X707clcqJMmI4OTI4MWEtMDBmNS00OGIwLThiZmYtOWJhMDdiNTc3ZmU3?resourcekey=0-z0sQH4Jjn_-nLn64zuPDvg

Here 0B-9X707clcqJMmI4OTI4MWEtMDBmNS00OGIwLThiZmYtOWJhMDdiNTc3ZmU3 is your folder id.

Make sure to read the Important note below.

Microsoft OneDrive

Create a new app registration

Proceed to Azure -> App registrations -> New registrations

Name:
Supported account types: This parameter can not be changed later.
If you plan to use your personal OneDrive account, choose Personal Accounts only

Will be supported in the final version:
If your Microsoft account is a part of the organization, choose Accounts in this organizational directory only or another organizational directory option.

Redirect URI: - you can change this parameter later
Platform: Web

PHPRunner:
/oauthcallback.php
For example
https://my.site/app/oauthcallback.php
or
http://localhost:8086/oauthcallback.php

ASPRunner.NET:
/oauthcallback
For example
https://my.site/app/oauthcallback
or
http://localhost:8086/oauthcallback

Press Register to create the application.

Configure app registration

App registrations -> Your app, Proceed to Overview
Application (client) ID - copy to PHPRunner/ASPRunner.NET as Client ID

Proceed to Certificates & secrets, click 'New client secret'
After the secret is created copy its Value (not the Secret ID!) to the Client Secret field in PHPRunner/ASPRunner.NET

Proceed to API Permissions
Click Microsoft Graph and add permissions.
Use the search tool.
The following permissions need to be added:
offline_access
Files.ReadWrite

Proceed to Authentication
Add the Redirect URL if you didn't do that before or need to add a new one.
Press Add platform, choose Web.
See above which Redirect URL to enter.

Proceed to OneDrive.
Note the URL in browser's address box. It should be something like this
https://onedrive.live.com/?id=root&cid=7FD32AC638D2A7
Copy the cid parameter value to Drive field in PHPRunner
For example:
7FD32AC638D2A7

You are all set. Now you can run your application.

Important

This applies to both Google Drive and Microsoft OneDrive. After the project is built and published, open it in the web browser and proceed to any page of a table where cloud storage is used. You will be redirected to Google or Microsoft site to log in.
Log in under the account that should be used to store the files. Then the application will save the credentials, and no further login will be needed.

The credentials are saved in \templates_c\googledrive.php or onedrive.php file respectively.
If you need to change the OneDrive or GoogleDrive configuration and start storing files under a different account, delete that file, then close all browser windows to clear the session. Open any page where cloud storage is used in the browser again and log in to Google or Microsoft using your new account.

Amazon S3

You need to specify Access Key ID, Secret Access Key, S3 Bucket name, Region and optional path.

1. Logon to AWS Console as a root user.

2. In the navigation bar on the upper right, choose your account name or number and then choose My Security Credentials.

3. Expand the Access keys (access key ID and secret access key) section.

4. To create an access key, choose Create New Access Key. If you already have two access keys, this button is disabled and you must delete an access key before you can create a new one. When prompted, choose either Show Access Key or Download Key File. This is your only opportunity to save your secret access key. After you've saved your secret access key in a secure location, choose Close.

5. Go back to the account home page, select S3 from the list of Services. Create a new bucket or select an existing one. This is where you can see the Bucket Name and Region.

6. Important: in bucket properties, under Permissions, scroll down to Cross-origin resource sharing (CORS) and paste the following JSON there. It is required for Amazon S3 Javascript library to work.

[
    {
        "AllowedHeaders": [
            "*"
        ],
        "AllowedMethods": [
            "HEAD",
            "GET",
            "PUT",
            "POST",
            "DELETE"
        ],
        "AllowedOrigins": [
            "*"
        ],
        "ExposeHeaders": [
            "ETag"
        ]
    }
]

Notification API

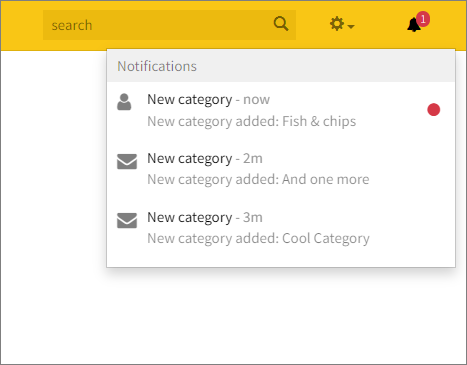
To enable Notification API, proceed to Miscellaneous screen, click 'Notification API' button, enable this feature and create a new table to store notifications. Now, since this is an API, we need to write some code to make it work. Let's start with something simple. When someone adds a new record to the Categories table we also want to create a notification.

For this purpose, we will add the following code to the Categories table AfterAdd event:

PHP

addNotification( "New category added: ".$values["CategoryName"] , "New category", "fa-envelope", makePageLink( "categories", "view", $keys) );

C#

CommonFunctions.addNotification( "New category added: " + values["CategoryName"].ToString() , "New category", "fa-envelope", makePageLink( "categories", "view", keys) );

If everything worked as expected, we will see a new notification added after each new record in the Categories table. And if we click on any notification, it will take us to that new Category view page.

Let's take a closer look at this function's parameters.

PHP
function addNotification( $message, $title = null, $icon = null, $url = null, $expire = null, $user = null, $provider = null )

C#
function CommonFunctions.addNotification(dynamic _param_message, dynamic _param_title = null, dynamic _param_icon = null, dynamic _param_url = null, dynamic _param_expire = null, dynamic _param_user = null, dynamic _param_provider = null)

Parameters:

$message - notification text

$title - optional notification title

$icon - optional icon, can be in one of three formats:

URL - "https://website.com/path/image.png" or "images/file.gif"

Bootstrap icon: "glyphicon-film", "glyphicon-hand-right"
The full list of available Bootstrap icons.

Font Awesome icon: "fa-envelope", "fa-user"
The full list of available Font Awesome icons.

$url - optional URL. When specified, a click on notification sends the user to the specified address. See makePageLink function

$expire - optional expiration date and time for the message. Can be either datetime in "YYYY-MM-DD hh:mm:ss" format, or a number of minutes the notification should be visible. After the expiration date/time the notification will be deleted from the notifications table.

Examples:
"2022-01-10 00:00:00" or 1440 for 24-hour period

$user - username the message should be visible to. If not specified, all users and guests will see the notification.

$provider - when $user is a database user, whose username and password are stored in a database table, this parameter must be empty. When the user is from Active Directory, OpenID, Google etc, then put the two-letter security provider code here. You can find it on the 'Security screen' under the provider settings dialog.

Alternative syntax

PHP
function createNotification( $params )

C#
function CommonFunctions.createNotification( dynamic params )

$params - array of notification parameters
$params["message"] - corresponds to $message parameter in addMessage()
$params["title"] - notification title
$params["icon"] - icon
$params["url"] - URL
$params["expire"] - expiration datetime or time in minutes
$params["user"] - user
$params["provider"] - security provider

Creating a link to an application page

You can use a helper function makePageLink to quickly create links to any application page.

PHP
function makePageLink( $table, $pageType, $keys = null, $additionalParams = array() )

C#
function CommonFunctions.makePageLink( $table, $pageType, $keys = null, $additionalParams = array() )

Parameters:
$table - name of the table the page belongs to. Specify empty string for pages like login, menu etc.

$page - page type like "list", "add", "edit"

$keys - when creating a link to edit or view page, specify record keys here. This can be either simple array of values, like
array( 10, "JOHN")
or associative array with field names as keys:
array( "department" => 10, "last_name" => "JOHN")
When used in 'After record updated' or 'After record added' event, pass the $keys parameter of the event as is.

$additionalParams - any additional params you want to add to the URL.
array( "page" => "list1" ) will create a URL to the additional list page named "list1"

Examples:

PHP

makePageLink( "cars", "list", null, array( "page" => "list1" ))

C#

CommonFunctions.makePageLink( "cars", "list", null, new XVar("page", "list1"))

The code above will produce a link "cars_list.php?page=list1", which points to the additional List page called list1.

PHP

makePageLink( "cars", "view", $keys )

C#

CommonFunctions.makePageLink( "cars", "view", keys )

When called from the 'After Record Added' event returns a link to the View page of the newly added record.

Enjoy!


DevQuest contest with prizes

$
0
0

Welcome to DevQuest! We have built a little quest that is both fun and educational and dedicated to the topic of web development. There are either questions total. Most of them are quite simple but some will require a bit of thinking. All of these questions can be answered with the help of your web browser and developer tools. We recommend using Google Chrome and Chrome Developer Tools but other browsers offer similar functionality.

You would need to view the page source, use Javascript console, use the Network tab in Developer Tools, use colorpicker etc. Your web browser is all you need.


There are prizes!

Five first prizes - $50 Amazon gift card.
Five second prizes - $100 credit on any of our products.
Twenty third prizes - $50 credit on any of our products.

Rules

Everyone can participate but in order to qualify for prizes, you need to be a customer, former or current.

The contest is open till 23:59 Friday, February 18, 2022. We will announce the winners shortly after.

What if I need help?

We understand, that some questions can be too difficult to handle for absolute beginners. For this purpose, we created a support thread in our forums where we will be posting occasional tips.

Also, here are some useful links.

View page source in Chrome

Using colorpicker

How to inspect CSS

Troubleshooting custom buttons in PHPRunner/ASPRunner.NET

Basics of SQL query syntax

Click the button below to start and make sure to register using a working email address, this is how we contact you if you win. Good luck!

Let's go!

Building visually appealing web applications

$
0
0

When you build a public-facing application you need to make sure it looks sharp. In this article, we'll show you a few ideas of how you can make PHPRunner and ASPRunner.NET projects look unique.

List page grid

Let's start with the grid on the List page. As an example, we will be using a recently updated News template that comes with PHPRunner and ASPRunner.NET. We want to draw attention to the very first element, making it bigger than others.


Luckily, it is fairly easy to implement. Building a custom grid like this only involves a few lines of CSS code. More than that, there is a great Grid by example website that provides all the required CSS code.

1. In the Page Designer proceed to that List page and set grid type to 'vertical-grid'.

2. Under Editor->Custom CSS add the following CSS code.

.r-record-body{
    width:auto !important;
    margin:0px !important;
    padding:3px !important;
    width:auto !important;
}

.r-record-body:first-child {
    grid-column: 1 / 3;
    grid-row: 1 / 3;
}
.r-grid > .r-fluid[data-location="grid"] {
    display: inline-grid;
    grid-template-columns: repeat(4, 24%);
    grid-template-rows: repeat(4, auto);
    justify-content: center;
    align-content: end;
}

This is it. If you now build and run your project, you will see a grid similar to the one on the screenshot above.

Quick filter menu with icons

Take a look at this menu that comes with the Classified template. This is basically a custom filter similar to one that you can see on the left side.

Let's see how you can do something similar in your own project.

1. This menu is database-driven. Here is an example of the clcategory table that powers this menu in the Classified template. This is what kind of data it stores.

Faicon here is a field that holds the name of the icon from Font Awesome. Don't worry, you do not need to enter those names manually, we have built a special dialog that allows users to select an icon. We'll talk about this later in this article.

2. Once you have your categories data ready it is time to insert the menu. Proceed to the List page in the Page Designer and insert a new code snippet above the grid, as appears on the screenshot below.

3. Here is the code you need to use in that snippet

PHP code:

$cats_rs = DB::Select("clcategory");
while($cat = $cats_rs->fetchAssoc()){
	$cat_count_rs = DB::Select("clmain",array("Category" => $cat["CategoryName"] ));
	$cat_count = $cat_count_rs->fetchAssoc();
	if( $cat_count )
		echo "".$cat["CategoryName"]."";
}

C# code

dynamic cat = XVar.Array(), cat_count = null, cat_count_rs = null, cats_rs = null;
cats_rs = XVar.Clone(DB.Select(new XVar("clcategory")));
while(XVar.Pack(cat = XVar.Clone(cats_rs.fetchAssoc())))
{
	cat_count_rs = XVar.Clone(DB.Select(new XVar("clmain"), (XVar)(new XVar("Category", cat["CategoryName"]))));
	cat_count = XVar.Clone(cat_count_rs.fetchAssoc());
	if(XVar.Pack(cat_count))
	{
		MVCFunctions.Echo(MVCFunctions.Concat("", cat["CategoryName"], ""));
}
}

Things you would need to change here:
clcategory - name of the table with categories
clmain - name of the main table
CategoryName - name of category field in categories table
Category - name of the category field in the main table
faicon - name of the field in categories table that stores icon name

The purpose of this code is to display a list of categories with respective icons and make them hyperlinks pointing to all items in the selected categories. A sample link will look like this:

clmain_list.php?page=list&f=(Category~equals~Jobs)

4. Now we need to make it look pretty. For this purpose add the following CSS code

[data-itemid="category_list"] {
    display: flex !important;
    gap: 3px;
}

[data-itemid="category_list"] .category_item {
    flex: auto;
    text-align: center;
    display: flex;
    flex-direction: column;
    align-items: center;
    padding: 10px 0;
    background: rgba(255, 255, 255, 0.28);
    border: none !important;
    transition: .4s;
    cursor: pointer;
}

[data-itemid="category_list"] .category_item:hover {
    background: white;
}

[data-itemid="category_list"] .category_item .fa {
    margin-bottom: 10px;
    width: 20px;
    height: 20px;
    font-size: 20px;
    color: white;
}

[data-itemid="category_list"] .category_item a {
    color: white;
}

[data-itemid="category_list"] .category_item:hover a,
[data-itemid="category_list"] .category_item:hover .fa {
    color: black;
}

Customizing breadcrumbs

We will be using the breadcrumbs example as it appears on the View page in the News template. We want to display a home icon, category name, and a news title itself.

1. Enable breadcrumbs under Page Designer -> View page -> Options -> Misc

2. Add the following code to View page: Before Display event.

PHP code:

$xt->assign( "breadcrumbs", true );
$xt->assign( "breadcrumb", true );

// link to 'home' 
$xt->assign("crumb_home_link", GetTableLink("newsmain","list"));
$breadcrumb = array();

// link to category
$breadcrumb[] = array("crumb_attrs" => "href='".GetTableLink("newsmain","list")."?f=(Category~equals~".rawurlencode($values["Category"]).")'", "crumb_title_link" => true,"crumb_title" => $values["Category"]);

// article name itself, no link
$breadcrumb[] = array("crumb_attrs" => "", "crumb_title_span" => true,"crumb_title" => $values["Title"]);
$xt->assign_loopsection("crumb", $breadcrumb);

C# code:

xt.assign(new XVar("breadcrumbs"), new XVar(true));
xt.assign(new XVar("breadcrumb"), new XVar(true));

// link to 'home' 
xt.assign(new XVar("crumb_home_link"), (XVar)(MVCFunctions.GetTableLink(new XVar("newsmain"), new XVar("list"))));
breadcrumb = XVar.Clone(XVar.Array());

// link to category
breadcrumb.InitAndSetArrayItem(new XVar("crumb_attrs", MVCFunctions.Concat("href='", MVCFunctions.GetTableLink(new XVar("newsmain"), new XVar("list")), "?f=(Category~equals~", MVCFunctions.RawUrlEncode((XVar)(values["Category"])), ")'"), "crumb_title_link", true, "crumb_title", values["Category"]), null);

// article name itself, no link
breadcrumb.InitAndSetArrayItem(new XVar("crumb_attrs", "", "crumb_title_span", true, "crumb_title", values["Title"]), null);
xt.assign_loopsection(new XVar("crumb"), (XVar)(breadcrumb));

Single record view on the List page

We have two tasks here. First, we want to use an image as a background of the whole record cell, while displaying the text over this image. And second, we want this image to pop up, when we move our mouse over the cell.

1. Set grid type to 'vertical-grid', set records per row to 4. This is how the grid itself is going to look.

2. Image will be only used as a background of the cell. To do so, we set 'View as' type of the image field to 'Custom' and use the following code.

PHP code

$img = my_json_decode($data["news_image"]);  
$value = "";

C# code

dynamic img = XVar.Array();
img = XVar.Clone(MVCFunctions.my_json_decode((XVar)(data["news_image"])));
value = XVar.Clone(MVCFunctions.Concat(""));

3. Now comes the CSS. This code goes to Editor -> Custom CSS area.

.newsmain .list_image {
    background-size: cover;
    background-position: center center;
    position: relative;
    -webkit-transition: 1s;
    -moz-transition: 1s;
    transition: 1s;
    -webkit-transform: scale(1);
    -moz-transform: scale(1);
    transform: scale(1);
    -webkit-transform-origin: 50% 100% 0;
    -moz-transform-origin: 50% 100% 0;
    transform-origin: 50% 100% 0;
}
.newsmain .r-record-body .panel-body tbody tr:first-child {
    display: block;
    position: relative;
    /* change the height of the record if you need to */
    height: 210px;
}
/* making the first cell (image) cover the whole record area */
.newsmain .r-record-body .panel-body tbody tr:first-child td{
    width: 100%;
    position: absolute;
}
.newsmain .r-record-body .panel-body tbody tr:first-child td:first-child * {
    height: 210px;
    display: inline-block;
    width: 100%;
    /* this is necessary to make sure image stays inside cell boundaries when enlarged */
    overflow: hidden !important;
}
/* enlarging image when mouse is hovering the cell */
.newsmain .r-record-body:hover .list_image{
    -webkit-transform: scale(1.035);
    -moz-transform: scale(1.035);
    transform: scale(1.035);
}

4. You may have noticed that this CSS uses the prefix .newsmain. The idea is to apply this CSS to a single page only, the List page of the main News table. To achieve this, we also need to add the following code to 'List page: Before Display' event.

PHP code:

$xt->assign("stylename","newsmain"); 

C# code:

xt.assign("stylename", "newsmain");

Enjoy!

Preventing SQL injection in low-code web applications

$
0
0

The main difference no-code and low-code applications is that you can easily extend low-code applications by adding your own code. This gives you both power and responsibility and we are going to talk about some typical mistakes people do while adding their own code.

Let me show you an example of the code one our clients were using in BeforeLogin event:

$rs = DB::Query("select * from users where username like '".$username."'");
$data = $rs->fetchAssoc();
...

Can you tell what is wrong here? If not, keep reading.


The problem is that the $username variable is inserted into a SQL Query as is and it opens the door for SQL injection. Every time you pass something that the user entered directly into a SQL Query you are in trouble. The attackers will be able to access your sensitive data or even make some changes to it.

The correct approach is to use the PrepareSQL function. This way the input will be properly escaped eliminating all potential SQL injection risks.

$sql = DB::PrepareSQL("select * from users where username like ':1'", $username);
$rs = DB::Query($sql);
$data = $rs->fetchAssoc();
...

This little change will make your life so much easier.

Additional reading:
Building secure low-code web applications (Section 11)

We also added SQL injection as one of the topics of the DevQuest contest (step 8).

Version 10.8

$
0
0

The beta version of PHPRunner and ASPRunner.NET 10.8 is here!

Beta version download links:
PHPRunner
ASPRunner.NET

This new version features the following improvements:

1. New dashboards look and customization options

There are many ways to configure and style dashboards in version 10.8. This is just one of them.

You can also fully customize the appearance of code snippets. You can choose between a classic look, left icon, right icon and customize all the colors.

2. Font manager

You can add new fonts, local and web fonts and use them in your projects. Also, you can use custom fonts in PDF.

3. Styling of tabs and sections

Also a new option, you can prevent sections from being folded. You may think of these sections as containers or panels that separate one group of elements from another.

4. New grid styling options

5. Charts export to PDF or image

6. Show different pages in mobile and desktop mode

You can create multiple pages of the same type and select which one will be shown on desktop and which one on mobile devices.

Enjoy!

Building a connected scatter chart

$
0
0

This is an example of work we did for one of our clients. This kind of approach will work with any AnyChart chart that PHPRunner and ASPRunner.NET do not support directly. Here is how you can approach this kind of task.

A Scatter chart is a graph that represents the relationship between two variables in a data set. Normally data is stored in the database as a set of (x,y) pairs. Here is the end result our client was looking for.


This is how it can be done

1. Create a Custom View in PHPRunner or ASPRunner.NET. Enable the View page for this custom view. This will be our chart page.

2. Open that View page in the Page Designer, remove everything you don't need and add the code snippet. Use the following code there:

PHP

echo "
";

C#

MVCFunctions.Echo("
");

The idea of this code is to create a container where the chart will be placed.

3. For this code snippet use the following CSS code in Page Designer:

:host {
margin-left:0px !important;
}
:host #container{
width:100%;
height:530px;
}

4. Custom View -> View Page -> BeforeDisplay event.

The idea of this code is to load the AnyChart library, retrieve data from the database, and pass it from the server side to Javascript using setProxyValue() function. The SQL query simply pulls all the data from the linechart table. Here is what kind of data is required to build this chart.

PHP

$pageObject->AddJSFile('https://cdn.anychart.com/releases/8.11.0/js/anychart-base.min.js');
$chartData = array();
$linechart_rs = DB::Query( "select * from linechart order by x asc,y asc" );
while( $cdata = $linechart_rs->fetchAssoc() ){
	unset( $cdata["ID"] );
	array_push( $chartData ,$cdata );
}
$pageObject->setProxyValue("chartData",$chartData);

C#

dynamic cdata = XVar.Array(), chartData = null, linechart_rs = null;
pageObject.AddJSFile(new XVar("https://cdn.anychart.com/releases/8.11.0/js/anychart-base.min.js"));
chartData = XVar.Clone(XVar.Array());
linechart_rs = XVar.Clone(DB.Query(new XVar("select * from linechart order by x asc,y asc")));
while(XVar.Pack(cdata = XVar.Clone(linechart_rs.fetchAssoc())))
{
   cdata.Remove("ID");
   CommonFunctions.array_push((XVar)(chartData), (XVar)(cdata));
}
pageObject.setProxyValue(new XVar("chartData"), (XVar)(chartData));
return null;

5. And the final step. Custom View -> View Page -> Javascript OnLoad Event.

anychart.licenseKey( Runner.anychartLicense );
chart = anychart.scatter();

var series = chart.line(proxy["chartData"]);
series.markers(true);
series.labels(true);

chart.container("container");
chart.xScale().minimum(0).ticks({ interval: 5 });
chart.yScale().minimum(0).ticks({ interval: 5 });
chart.xGrid(true);
chart.yGrid(true);

chart.xGrid().stroke();
chart.yGrid().stroke();

chart.draw();

Using CSS grid for mobile screens – a complete tutorial

$
0
0

Task - implement custom grid display in PHPRunner or ASPRunner.NET applications on mobile screens. The idea is to use the same HTML and achieve our goal using CSS only.

CSS Grid layout is nothing new and excellent tutorials are available on the web for those who want to learn more. In this article we will only cover all the relevant details to PHPRunner and ASPRunner.NET.

In this article, we will be using our Forum template as an example of using CSS Grid Layout.

Desktop version

Here is where we start. Just a regular desktop grid with all database fields occupying their own cell.


Mobile version

This is what we aiming for. We want to have two rows and three columns. First column is occupied by StartedBy field, second column holds Topic and Category fields, and the last column displays Replies and Activity fields.

Here is a more schematic look of the desired layout. Note the numbers in red, these are grid coordinates that we will use in our CSS to define where each field is to be displayed.

Now take a look at the top left cell. It's occupied with the userpic of the user, who started the thread. We want this image to occupy both cells of the first columns. If you take a look at the numbers in red, you see that we want to take the space between markers 1 and 2 horizontally, and between markers 1 and 3 vertically. So here is the CSS that does the job for this column:

.r-gridrow td[data-field="startedby"] {
   	 grid-column-start: 1;
    	 grid-column-end: 2;
         grid-row-start: 1;
         grid-row-end: 3;
  }

And here is the complete CSS for this kind of layout. It needs to be added to Editor -> Custom CSS screen.


// the following code will only apply to the mobile version, when display width us 767 pixels or less
@media screen and (min-width: 767px) {
    // lets set gridrow properties	
   .r-gridrow {
        display: grid !important;
        grid-template-columns: 40px 60% auto;
	/* we want the first column to take 40 pixels, the second column should take 60% and the third column will occupy the rest */
	/* here we remove unnecessary margins and borders */
        margin-bottom: 0px !important;
        border-radius: 0 !important;
        border-top: 0px !important;
        border-left: 0px !important;
        border-right: 0px !important;
        border-bottom: 1px solid #DDDDDD;
    }
    // startedby field - first column and we let it occupy both rows
   .r-gridrow td[data-field="startedby"] {
   	 grid-column-start: 1;
    	 grid-column-end: 2;
         grid-row-start: 1;
         grid-row-end: 3;
  }
  // fields topic and category are combined in one and we let them occupy both rows of the second column
  .r-gridrow td[data-field="topic"] {
    grid-column-start: 2;
    grid-column-end: 3;
    grid-row-start: 1;
    grid-row-end: 3;
    //нужен отступ слева от startedby
    padding-left: 5px !important;
   }
   // forumreplies field - third column, first row
   .r-gridrow td[data-field="forumreplies"] {
    grid-column-start: 3;
    grid-column-end: 4;
    grid-row-start: 1;
    grid-row-end: 2;
    padding-right: 5px !important;
    padding-left: 5px !important;
    font-weight: bold;
    text-align: center !important;
   }
   // activity field - third column, second row
   .r-gridrow td[data-field="activity"] {
    grid-column-start: 3;
    grid-column-end: 4;
    grid-row-start: 2;
    grid-row-end: 3;
    text-align: center !important;
    align-self: end;
   }
}

This is pretty much it and you can use this technique in your own projects to customize the look of the mobile version.

Additional info

If you want to learn more about CSS frid layout, check these links:

https://www.codeinwp.com/blog/css-grid-tutorial-layout/
https://www.freecodecamp.org/news/a-beginners-guide-to-css-grid-3889612c4b35/

Tracking visitors behaviour in your web application

$
0
0

So you want to know how much time users spend on any specific page of your web application? This article explains how to log what pages your users visit and how much time they spend on each page. This kind of data can provide valuable insight into what forms of your application are too complicated and need to be split into several smaller forms. Or if they keep coming back to the welcome page this may mean your navigation inside the app can be improved.

1. Create log table

The following SQL script creates the log table in the database. The syntax is for MySQL, you can create a similar table in any other database manually, just make sure that field names and datatypes stay the same.

CREATE TABLE `timetracker` (
  `trackerId` int(11) NOT NULL AUTO_INCREMENT,
  `pagename` varchar(250)  DEFAULT NULL, /* page URL */
  `timeon` datetime DEFAULT NULL, /* when user entered the page */
  `timeoff` datetime DEFAULT NULL, /* when user left the page */
  `userID` varchar(100) DEFAULT NULL, /* username */
  `recordID` varchar(100) DEFAULT NULL, /* in the case of edit/view pages this field will store the ID of the record */
  PRIMARY KEY (`trackerId`)
)

A few notes here:

Note 1: Login is not required. If your project doesn't use login, 'userID' field will be empty.

Note 2: if 'timeoff' field is empty that means user spent less than five seconds on the page.

Note 3: it makes sense to add 'timetracker' table to the project as well so you can test this functionality. If you do so, set 'View as' time of timeon/timeoff fields to 'Datetime'.

2. Javascript code

The following Javascript code needs to be added under Event Editor -> custom_functions.js

$("document").ready(function() {
    Runner.customEvents = [];
    // every notifyInterval seconds we execute an AJAX requests that tells the server that user is still ont he page
    var notifyInterval = 5;

    // this function is executed on every page load, here we tell the server what page the user currently on

    function setPageTimer(pageObj) {
	// ajax- parameters with the page URL
        var notify_params = { pageOpen: 1, pageName: Runner.pages.getUrl(pageObj.shortTName,pageObj.pageType) };
	// if this is an Edit/View page we also pass an ID of the record
        if (pageObj.pageType === "edit" || pageObj.pageType === "view") notify_params.recordID = pageObj.keys[0];
	// we send AJAX request and get back trackerId value of the current log table recod
        $.get("", notify_params, function(TrackerID) {
	// send AJAX request with the current notifyInterval value, that tells the server the user is still on the page
            interval = setInterval(function() {
                $.get("", { TrackerID: TrackerID });
            }, notifyInterval * 1000);
        });
    }

    var originalInit = Runner.pages.RunnerPage.prototype.init;
  
    Runner.pages.RunnerPage.prototype.init = function() {
        var pageObj = this;
        var isTab = typeof this.tabControl !== "undefined";
	// check if the current page a details tab
        if (isTab) {

	if (!Runner.customEvents.includes(this.tName + "_" + this.pageType)) {
            Runner.customEvents.push(this.tName + "_" + this.pageType);
            pageObj.on("afterPageReady", function() {
                // when tab is closed we clear the interval counter
		pageObj.tabControl.off("hide.bs.tab").on("hide.bs.tab", function(e) {
                    clearInterval(interval);
                });
		// when details tab is open we start the counter
                pageObj.tabControl.off("show.bs.tab").on("show.bs.tab", function(e) {
                    var activeTab = $(e.target);
                    var panelContent = activeTab.parents("ul").next();
                    var activePanel = panelContent.find(".tab-pane.active");

                    setPageTimer(Runner.pages.PageManager.getById(activePanel.find(".r-form").attr("data-pageid")));

                });
            });
				}

        }

        if (!isTab || (isTab && this.$panel.parents(".tab-pane").hasClass("active"))) {
            setPageTimer(pageObj);
        }

        originalInit.call(this);
    }
});

3. Server-side code (PHP and C#)

The following code goes to the AfterAppInit event.

PHP:

$currentDateTimeForDb = localdatetime2db( runner_date_format("m-d-y H:i:s") );
// receiving AJAX request with the new page URL
// in timetracker table we create a new record 
// and return the TrackerID value of the new record
if( postvalue("pageOpen") != false ){
		$data = array();
		$data["pagename"] = postvalue("pageName");
		$data["timeon"] = $currentDateTimeForDb;
		$data["userID"] =  Security::getUserName();
		if(postvalue("recordID") != false){
			$data["recordID"] = postvalue("recordID");
		}
		DB::Insert("timetracker", $data);
		//return TrackerID
		echo DB::LastId();
		exit();

}
// receiving AJAX request that tell us we are still on the same pageпродолжается
// we just update the value of timeoff field for the current TrackerID
if( postvalue("TrackerID") !=false ){
	$now_datetime = $currentDateTimeForDb;
	DB::Update("timetracker",array("timeoff"=> $now_datetime ),array("trackerId" => postvalue("TrackerID") ));
	exit();
}

C#:

dynamic currentDateTimeForDb = null;
currentDateTimeForDb = XVar.Clone(CommonFunctions.localdatetime2db((XVar)(MVCFunctions.runner_date_format(new XVar("m-d-y H:i:s")))));
if(MVCFunctions.postvalue(new XVar("pageOpen")) != false)
{
	data = XVar.Clone(XVar.Array());
	data.InitAndSetArrayItem(MVCFunctions.postvalue(new XVar("pageName")), "pagename");
	data.InitAndSetArrayItem(currentDateTimeForDb, "timeon");
	data.InitAndSetArrayItem(Security.getUserName(), "userID");
	if(MVCFunctions.postvalue(new XVar("recordID")) != false)
	{
		data.InitAndSetArrayItem(MVCFunctions.postvalue(new XVar("recordID")), "recordID");
	}
	DB.Insert(new XVar("timetracker"), (XVar)(data));
	MVCFunctions.Echo(DB.LastId());
	MVCFunctions.ob_flush();
	HttpContext.Current.Response.End();
	throw new RunnerInlineOutputException();
}
if(MVCFunctions.postvalue(new XVar("TrackerID")) != false)
{
	dynamic now_datetime = null;
	now_datetime = XVar.Clone(currentDateTimeForDb);
	DB.Update(new XVar("timetracker"), (XVar)(new XVar("timeoff", now_datetime)), (XVar)(new XVar("trackerId", MVCFunctions.postvalue(new XVar("TrackerID")))));
	MVCFunctions.ob_flush();
	HttpContext.Current.Response.End();
	throw new RunnerInlineOutputException();
}
return null;

How to scroll List page to the record that was edited

$
0
0

When you have a long List page with dozens of records, editing or viewing a record on a separate can be cumbersome. After you edit or view a record, clicking 'Back to List' will display all the records from the top and you lost the position of the record you just edited. This simple technique will allow you to scroll the List page back to the original position and also it will highlight the record that was just edited or viewed.

To implement this feature in your project, add the following code to respective events.

List page --> Javascript onload event

window.onscroll = function() {
localStorage.setItem('scroll_value', window.pageYOffset);
};

if(localStorage.getItem('scroll_value')){
window.scrollTo(0, localStorage.getItem('scroll_value'));
localStorage.setItem('scroll_value', 0);
}
if(localStorage.getItem("editid1")){
var id = $("[href*='editid1="+localStorage.getItem("editid1")+"']:first").closest("tr").attr("id");
$("#"+id).css("background-color","#AFEEEE");
localStorage.setItem("editid1","");
}

Add page --> Javasctipt onload event

localStorage.setItem("editid1",proxy["editid1"]);

Add page --> After Record Added event

PHP:

$k = array_values($keys);
$pageObject->setProxyValue("editid1", $k[0]);
echo " ";

C#:

dynamic k = XVar.Array();
k = XVar.Clone(CommonFunctions.array_values((XVar)(keys)));
pageObject.setProxyValue(new XVar("editid1"), (XVar)(k[0]));
MVCFunctions.Echo(" ");

Edit page / View page --> Javascript onload event

localStorage.setItem("editid1",proxy["editid1"]);

Edit page / View page --> Bebore Display event

PHP:

$pageObject->setProxyValue("editid1",postvalue("editid1"));

C#:

pageObject.setProxyValue(new XVar("editid1"), (XVar)(MVCFunctions.postvalue(new XVar("editid1"))));

This is it. Enjoy!

How to create a beautiful dashboard theme

$
0
0

People often ask us this: "I found a great-looking theme on the Internet, how do I import it into PHPRunner or ASPRunner.NET". The problem is that all themes are implemented differently, there is no standard they follow and they cannot be "imported". However, it is possible to make your project look exactly like any of those themes and this article will teach you how to do this.

For the inspiration, we will be using Material Dashboard Dark Edition theme by Creative Tim. Here is how it looks:


1. Create a dashboard

For starters, we simply create a dashboard with three rows and add dashboard elements there. The top row is for charts, the second one is for charts and the last one is for grids. Using "Colors" button we can customize the colors of all dashboard elements. Here are color settings for charts:

For code snippets choose snippet style 'Left icon'. Here are the snippet's color settings. The background color will be different for each snippet.

And here are color settings for grids. The header background will be different for different grids.

2. Code snippets

Here is the code that we use for the first code snippet.

$header = "
Used space
49/50GB
"; echo "";

Note, that we have three different pieces of info in this snippet and we assign a separate CSS class like snip_title to each piece. We will customize it later via Custom CSS.

3. Fonts

Another useful feature of version 10.8 is extended support for fonts. The original theme uses the famous Roboto web font and we will do that too. In the Page Designer proceed to the List page of the first grid, select all grid fields and grid headers and set 'font family' to Roboto. Now select just the header elements and set font size to 17px. In a similar manner set the font size for regular grid fields.

Repeat the same for all grids that are part of your dashboard.

4. Topbar and sidebar settings

This needs to be done on the Style Editor screen. This is fairly straightforward.

Also, on the same screen, click 'Grid colors' button and specify grid colors.

So far so good. we have been only using the built-in PHPRunner/ASPRunner.NET functionality and it looks pretty good already.

You can see that the sidebar color doesn't match, chart colors need to be tweaked, and snippet fonts and positioning of elements need more work. Also, grids can use and bit more styling too.

5. Charts code

Chart customization is done via code added to the ChartModify event. We already have this code for you, so you can just copy and paste it into your event. The code is almost identical for all charts, just change the background color in the first line.

chart.background().fill("#339465");
var yTitle = chart.yAxis().title();
yTitle.enabled(false);
chart.xAxis().labels().fontColor("#BCDBD0");
chart.yAxis().labels().fontColor("#BCDBD0");

chart.xAxis().labels().format(function() {
  var value = this.value;
  // limit the number of symbols to display
  value = value.substr(0, 4);
  return value
});

var series = chart.getSeriesAt(0);
series.color("#FFFFFF");

6. Custom CSS

Here is the Custom CSS that does the rest of the job. Inline comments will help you navigate this code. The code needs to be added under Style Editor -> Modify CSS.

/* body background */

body {
background: #1a2035 !important;
    
}

/* left sidebar background */

.r-left:before {
    content: ' ';
    background-image: url(../../images/sidebar-2.jpg);
    background-position: 50%;
    position: absolute;
    top: 0;
    left: 0;
    height:  98%;
    width:  100%;
}

#mCSB_1 {
    
    opacity: 0.95;
height: 100%;    
    background: #1f283e;
}

/*  grids  
    make sure to replace grid IDs here with your own*/

#dashelement_categories_grid1 .panel-heading,
#dashelement_customers_grid1 .panel-heading {
    padding: 17px; 
}

#dashelement_categories_grid1 td,
#dashelement_customers_grid1 td {
    border-top-width: 1px; 
    border-color: hsla(0,0%,71%,.1);
    padding: 9px;
}

/* code snippets */

.snip_title {
color: #8b92a9;
    text-align: right;
    font-family: 'Roboto';
    font-size: 14px;
}    
    
.snip_body {
color: #606477;
    text-align: right;
    font-family: 'Roboto';
    font-size: 25px;
}    

.snip_link {
color: #a9afbbd1;;
    text-align: right;
    font-family: 'Roboto';
    font-size: 12px;
    padding-top: 20px;
}      

This is pretty much it. Here is the final result, the way how it looks in PHPRunner or ASPRunner.NET.

7. Sample projects

Requirements:
- MySQL database
- Version 10.8 of PHPRunner or ASPRunner.NET

Some people will find it easier just to download and run the sample projects that already have everything in there configured. Download a sample project, unzip it to a brand new folder, and execute SQL script ( MySQL only ) to create the required tables and data. Open the project in PHPRunner 10.8 or ASPRunner.NET 10.8, build and run.

Project for PHPRunner
Project for ASPRunner.NET

Enjoy!

A Complete Guide to Sending Emails with a Web-based Application

$
0
0

An old programmer's saying, coined by Jamie Zawinski, says “Every program attempts to expand until it can read mail". Jokes aside, email was and still is an integral part of our lives, and every web application needs to send emails to its users. This guide will walk you through all the steps to ensure every single email-sending aspect is covered.

This is going to be a long article and we plan to update it often. Here are the topics, that will be covered in this article.

  • Setting up an SMTP account (Gmail)
  • Ensuring Deliverability
  • Sending Mass Emails
  • Sending emails via API
  • Transactional emails
  • Receiving emails

Setting up an SMTP account (Gmail)

Let's start with the very basics. Here we will show how to create a new Gmail account and use it to send emails in your web application. All these steps are important.

1. Create a new Gmail account

Sign up for Gmail account.

2. Logon once via the web browser

This is also important. It activates your account.

3. Turn off 2FA

Two-factor authentication is for interactive logins. Our web application won't know how to do this.

4. Create an app-specific password

This password will be used only in this specific web application. Here is the article that explains how to create such a password.

5. SMTP settings

- Server address: smtp.gmail.com

- Port:

  • If you're using SSL, enter 465.
  • If you're using TLS, enter 587.

- Username: your Gmail email i.e. yourname@gmail.com

- Password: app-specific password created on step 4.

Now your app should be ready to send emails via a newly created Gmail account. Give it a try.

6. If something still doesn't work

If you use PHPRunner to build your web application, check this troubleshooting technique. It will show the whole dialog between the PHP code and the mail server and often will point you in the right direction.

If you use something else to build your web app, there is one more trick to try. Log on to Gmail on your desktop again. Once in a while, Gmail will block your web application for no apparent reason and you will see a warning like this after the login.

Once you click 'Check activity' you will see the screen like this one:

Confirm 'It was me' and try sending the email from your web application again. It should work.

Generate PDF files using NodeJS and PDFMake

$
0
0

1. Download and NodeJS on the web server. For Windows choose 64-bit MSI installer

2. Run and install keeping all default settings

3. Inside your project create a new folder named pdfmake

4. Proceed to that folder, start the command line and run

5. This will create index.js, in this file we will add the code that create PDF file. In our case, we will be generating due invoices for our cliens.

PDFMake documentation

Here is index.js file we that generates invoices.

6. Now we are ready to create PDF files. Here is how you execute it from PHP code:

And the same for C#:

Black Friday – Cyber Monday sale

$
0
0

Special offer: Buy one get one free

Time Remaining:


To take advantage of this offer place an order for any eligible product and contact support team with your order number to claim your gift. Buy two products – get two free gifts etc.

This offer applies to both new purchases and upgrades. Here is the list of eligible gifts:

Viewing all 95 articles
Browse latest View live