Quantcast
Channel: PHP – Xlinesoft Blog
Viewing all 95 articles
Browse latest View live

Building visually appealing web applications

$
0
0

When you build a public-facing application you need to make sure it looks sharp. In this article, we’ll show you a few ideas of how you can make PHPRunner and ASPRunner.NET projects look unique.

List page grid

Let’s start with the grid on the List page. As an example, we will be using a recently updated News template that comes with PHPRunner and ASPRunner.NET. We want to draw attention to the very first element, making it bigger than others.


Luckily, it is fairly easy to implement. Building a custom grid like this only involves a few lines of CSS code. More than that, there is a great Grid by example website that provides all the required CSS code.

1. In the Page Designer proceed to that List page and set grid type to ‘vertical-grid’.

2. Under Editor->Custom CSS add the following CSS code.

This is it. If you now build and run your project, you will see a grid similar to the one on the screenshot above.

Quick filter menu with icons

Take a look at this menu that comes with the Classified template. This is basically a custom filter similar to one that you can see on the left side.

Let’s see how you can do something similar in your own project.

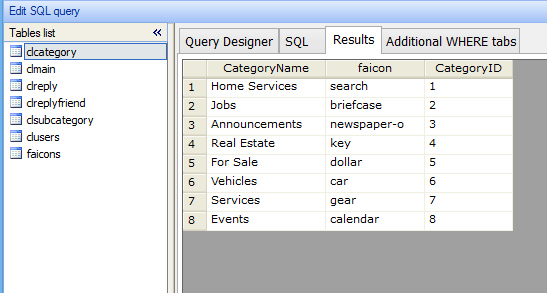
1. This menu is database-driven. Here is an example of the clcategory table that powers this menu in the Classified template. This is what kind of data it stores.

Faicon here is a field that holds the name of the icon from Font Awesome. Don’t worry, you do not need to enter those names manually, we have built a special dialog that allows users to select an icon. We’ll talk about this later in this article.

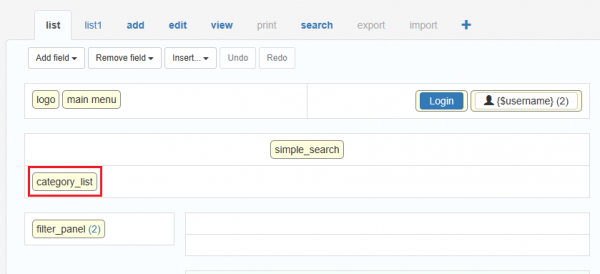
2. Once you have your categories data ready it is time to insert the menu. Proceed to the List page in the Page Designer and insert a new code snippet above the grid, as appears on the screenshot below.

3. Here is the code you need to use in that snippet

PHP code:

C# code

Things you would need to change here:
clcategory – name of the table with categories
clmain – name of the main table
CategoryName – name of category field in categories table
Category – name of the category field in the main table
faicon – name of the field in categories table that stores icon name

The purpose of this code is to display a list of categories with respective icons and make them hyperlinks pointing to all items in the selected categories. A sample link will look like this:

4. Now we need to make it look pretty. For this purpose add the following CSS code

Customizing breadcrumbs

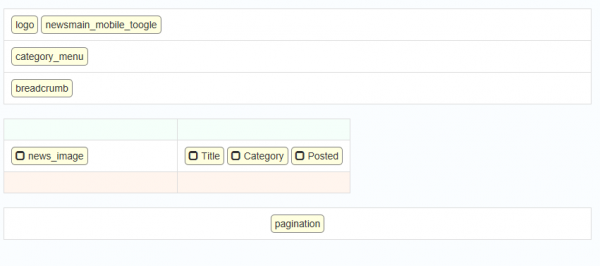
We will be using the breadcrumbs example as it appears on the View page in the News template. We want to display a home icon, category name, and a news title itself.

1. Enable breadcrumbs under Page Designer -> View page -> Options -> Misc

2. Add the following code to View page: Before Display event.

PHP code:

C# code:

Single record view on the List page

We have two tasks here. First, we want to use an image as a background of the whole record cell, while displaying the text over this image. And second, we want this image to pop up, when we move our mouse over the cell.

1. Set grid type to ‘vertical-grid’, set records per row to 4. This is how the grid itself is going to look.

2. Image will be only used as a background of the cell. To do so, we set ‘View as’ type of the image field to ‘Custom’ and use the following code.

PHP code

C# code

3. Now comes the CSS. This code goes to Editor -> Custom CSS area.

4. You may have noticed that this CSS uses the prefix .newsmain. The idea is to apply this CSS to a single page only, the List page of the main News table. To achieve this, we also need to add the following code to ‘List page: Before Display’ event.

PHP code:

C# code:

Enjoy!


Version 10.9

$
0
0

The beta versions of PHPRunner and ASPRunner.NET 10.9 are here!

Download links:

PHPRunner 10.9 beta

ASPRunner.NET 10.9 beta

Please note that this is a beta version and is not meant to be used in production.

This new version features the following improvements:

Excel-like filters in field headers on List page

The feature many of you asked for and now it is here.

To enable it proceed to the Page Designer, open the List Page, click on the fields in the grid header and on the right-side settings panel select ‘Filter’ and ‘Apply to all fields’. There also will be additional ways to enable this feature as well.

Users can now enable multiple 2FA methods

Each user can now select which 2FA methods they can use to protect their account.

New Menu API functionality

Menu elements can be added or removed in the custom code. You can, for instance, load the whole menu from the database now.

Improved page load speed

This is being achieved by reducing number of JS and CSS files, something that we need to do from time to time to keep the page load speed under control.

Notifications API update

Implemented fine-tuned permissions system to define who can see notifications:
– a specific user only
– specific group members only
– only users logged via Active Directory or via Google
– only users who have access to a specific page
– only users who have access to a specific record

New totals options

You can choose between displaying current page totals and all data in the table totals.

Added Swal2 library for popups

Now you can simply use any code example from Swal2 library.

Upgraded jQuery library

The latest stable version of jQuery 3.6 is now bundled with PHPRunner and ASPRunner.NET.

Another minor upgrade is planned in January-February

– SQL and REST Views functionality improvements
– a bunch of minor improvements and fixes related to security, login and registration pages

Enjoy!

Version 11

$
0
0

We are working on version 11 of PHPRunner and ASPRunner.NET. From the engineering point of view, this is a huge redesign that will significantly improve the user experience. We are switching from storing project data in XML and SQLite databases to a real database like MySQL or SQL Server. Also, switching from a slow Internet Explorer engine that powers our UI to Chrome.

Benefits

  • Much faster UI
  • Much faster work with large ( 1000+ tables ) projects
  • Multi-user work!
  • Revisions and roll-backs
  • Later: Mac/Linux versions

This will be a game-changer! Plus it won’t break project compatibility and all v10.x project will open and build without any issues. We estimate that version 11 will take about six months to build and to be available in the first half of year 2023. This is a long time but it worth the wait.

Also, switching to HTML-based UI will make PHPRunner and ASPRunner.NET wizard software much better looking. It opens possibilities like light and dark themes in the software itself.

Yet another custom login page

$
0
0

As many of you know, we recently launched a side project named PicTur. This is a website, built with the help of PHPRunner, that allows users build beautiful travel stories. Instead of letting you pictures collect dust you can create a travel story and share with the world. Take a look open an account and maybe create a story or two.

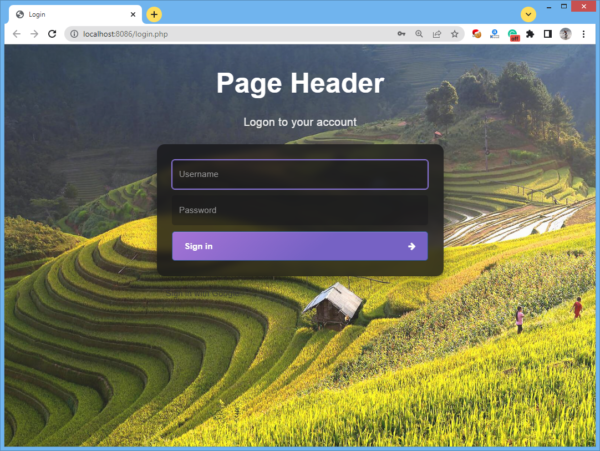
This website was built with the help of PHPRunner and was heavily customized. We will post series of articles talking about the most interesting parts of this project. Let us start by showing how pages like login, register and remind password were prettified. First, we found a good login template at Carrd, customized it a bit and imported CSS into PHPRunner.

This is the end result:

PicTur..app login page

Login page layout

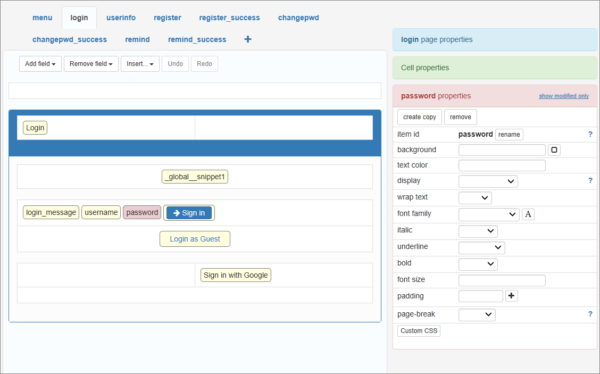
Here is how your login page is supposed to look in the Page Designer if you want to re-create the same in your project.

Login page layout in Page Designer

To add an arrow to the “Sign in” button select this button in the Page Designer and on the right side panel choose fa-arrow-right icon from Font Awesome set.

Header code snippet

Insert a code snippet above the login fields and use the following code there:

Custom CSS

The following code goes to Style Editor -> Custom CSS.

Enjoy!

Building a connected scatter chart

$
0
0

This is an example of work we did for one of our clients. This kind of approach will work with any AnyChart chart that PHPRunner and ASPRunner.NET do not support directly. Here is how you can approach this kind of task.

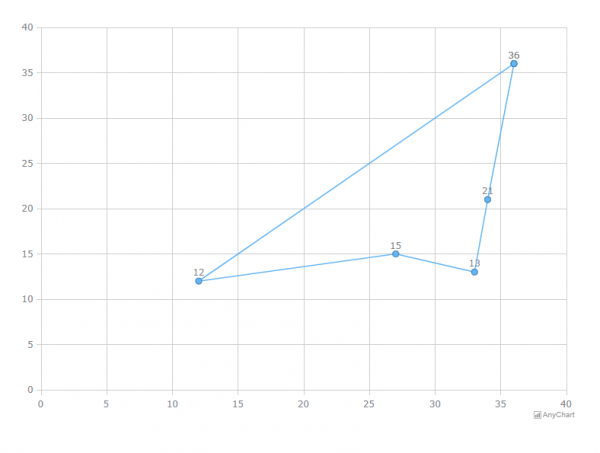
A Scatter chart is a graph that represents the relationship between two variables in a data set. Normally data is stored in the database as a set of (x,y) pairs. Here is the end result our client was looking for.


This is how it can be done

1. Create a Custom View in PHPRunner or ASPRunner.NET. Enable the View page for this custom view. This will be our chart page.

2. Open that View page in the Page Designer, remove everything you don’t need and add the code snippet. Use the following code there:

PHP

C#

The idea of this code is to create a container where the chart will be placed.

3. For this code snippet use the following CSS code in Page Designer:

4. Custom View -> View Page -> BeforeDisplay event.

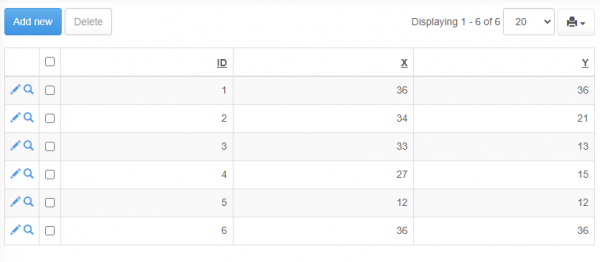
The idea of this code is to load the AnyChart library, retrieve data from the database, and pass it from the server side to Javascript using setProxyValue() function. The SQL query simply pulls all the data from the linechart table. Here is what kind of data is required to build this chart.

PHP

C#

5. And the final step. Custom View -> View Page -> Javascript OnLoad Event.

Version 11

$
0
0

We are still working on version 11 of PHPRunner and ASPRunner.NET. From the engineering point of view, this is a huge redesign that will significantly improve the user experience.

Many things take more time than expected. The earliest we will be able to show you a beta of v11 is end of August 2023.

Benefits

  • Much faster UI
  • Much faster work with large ( 1000+ tables ) projects
  • Multi-user work!
  • Revisions and roll-backs
  • Later: Mac/Linux versions

Digging deeper

  • Project data will be stored in the real database instead of SQLite and XML. It can eiher be a built-in database server that will come with the software or users can use their own database ( SQL Server, MySQL, Postgre ).
  • Since this is a regular database, data can be exported as a SQL file and stored in a version control system like SVN or Git.
  • UI improvement: project groups. You can create groups inside a project and move objects like tables and views there. Each group can also have its own relationship diagram. These groups will appear on all screens in the software.
  • Multi-user environment. One user starts editing table settings, this table automatically becomes locked, all other users will see it in read-only mode. Once user saves the project, new settings can be immediately seen by other users. There will also be manual lock functionality that would allow to make changes to common settings like Security.
  • Developers can be located anywhere in the world. There will be no need to provide a direct access to the database for remote users. PHPRunner/ASPRunner.NET will connect to the application server which will handle all database communication.
  • Revisions. You can review all revisions, can open an old version of the project in read-only mode, can rollback to that revision if required. Open two copies of the same project in two different instances of PHPRunner or ASPRunner.NET, one is current and another one is an older revision, and then copy something from one project to another.
  • Adding comments to saves/revisions ( manually and automatically ). Comments will be searchable that will help you quickly locate the revision you looking for.

This will be a game-changer! Plus it won’t break project compatibility and all v10.x project will open and build without any issues. Also, switching to HTML-based UI will make PHPRunner and ASPRunner.NET wizard software much better looking. It opens possibilities like light and dark themes in the software itself.

And for those who are interested to see how the internal structure of version 11 looks check this high-level diagram.

Tabbed elements in dashboards

$
0
0

Dashboards excel at showcasing a multitude of valuable information on a single page. However, there are instances when a basic dashboard layout falls short in accommodating the desired volume of data on a single screen. In this article, we will demonstrate a method for amplifying information presentation through the use of a tabbed component. It’s important to note that this is not a built-in and we will need to write a bit of code.

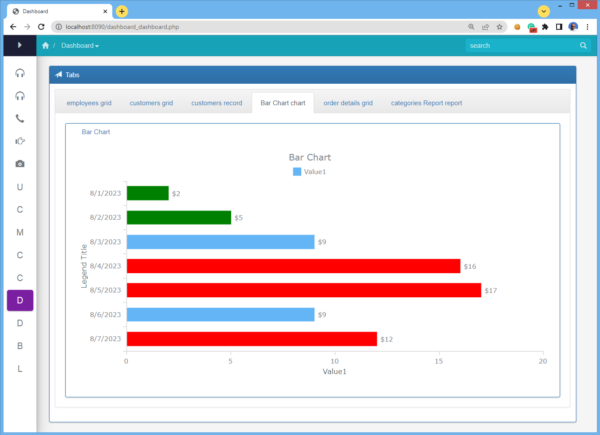
Here is what we after:


Instructions

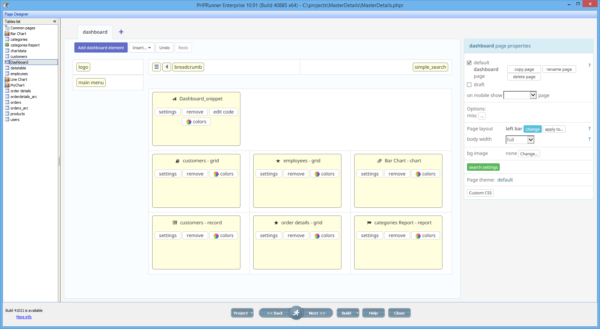
1. Create a dashboard

Dashboard layout needs to conform the following structure. The first row needs to have a single cell with the code snippet. All other objects that you want to appear in a tabbed element should occupy rows below the code snippet. It doesn’t matter how many elements are in each row, they will be moved inside the tabbed element anyway. In our example we are going to display three grids, a single record, a chart and a report inside the tabbed element.

Here is a sample layout:

2. Code snippet

The idea of this code is to display an empty tabbed panel. Nothing special here, just a basic Bootstrap-based HTML code. The only important thing here is the ID of this panel which is dashTabs. We are going to use this ID in both Javascript and CSS code.

PHP

C#
[csharp]
header = new XVar(“Tabs”);
MVCFunctions.Echo(“

\r\n
\r\n

\r\n

\r\n

\r\n
\r\n

\r\n

\r\n

“);
[/csharp]

3. Dashboard Javascript OnLoad event

This code loops through the array of dashboard elements and moves them one by one to the tabbed panel. See inline comments for more info.

4. Custom CSS

This code goes to Style Editor -> Modify CSS section. Just hiding some unnecessary decoration and making tabs look prettier.

Happy coding!

Long running process with notifications

$
0
0

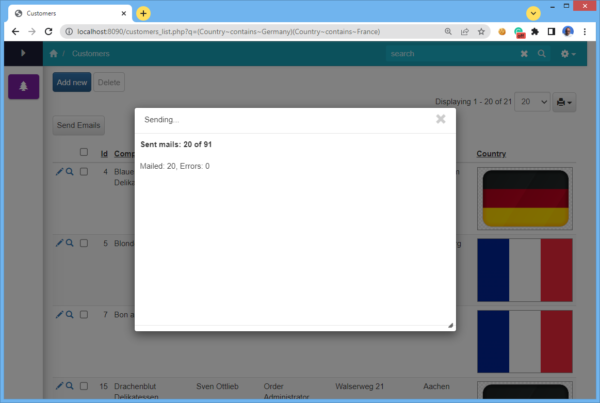
In a web application, some long running tasks may time out and not finish. To avoid this kind of limitation we will show you how to run such tasks reliably and, at the same time provide progress status to the end user so they know the task is still running. In this article we’ll show you how to achieve this in PHPRunner and ASPRunner.NET.

A common task like this is batch sending email notifications. The key is to initiate a process like this from JavaScript sending the next batch of tasks to the server via AJAX.


1. Button on the List page.

First, we will add a new button to the Customers list page titled ‘Send emails’. The following code goes to ClientBefore event. Leave Server and ClientAfter events empty.

// how many emails to send per step 
var recCount = pageObj.proxy["recCount"], mail_per_step = 10; 

// basic HTML code for the progress popup window
var html = "<div class><b>Sent mails: <span class='sent'>0</span> of <span>" + recCount + "</span></b></div>" + "<br><div>Mailed: 0</span>, Errors: <span class='errors'>0</span></div>";
 
 // showing the progress in a popup
	var popup = Runner.displayPopup({
	html: html,
	header: 'Sending...',
	afterCreate: function (win) {
        // starting sending emails, ajaxStep is a secursive function
		ajaxStep(0, mail_per_step);
	}
});

function ajaxStep(step, mail_per_step) {
	$.get("", { ajaxMail: true, ajaxstep: step, mail_per_step: mail_per_step }, function (response) {
		var json = JSON.parse(response);

                // using the response data to update the progress popup

		$(".sent").html(parseInt($(".sent").html()) + json["totalSent"]);
		$(".mailed").html(parseInt($(".mailed").html()) + json["mailed"]);
		$(".errors").html(parseInt($(".errors").html()) + json["errors"])
		
		if (parseInt(json["totalSent"]) < mail_per_step) {
		// time to exit the recursion. The number of processed records is less than 
                // number of records per step which means we ran out of data to process
			swal("Done");
		} else {
                // otherwise proceed to the next step
			step++;
			ajaxStep(step, mail_per_step);
		};
	});
}
return false;

2. List page, BeforeDisplay event.

In this event we simply calculate the number of records in the customers table and pass it to Javascript. This way our Javascript code knows how many emails to send.

Modify the SQL query to match your database structure.

PHP:

C#

3. After Table Initialized event.

This is where we actually run our job.

PHP

C#

Happy coding!


Infinite scroll

$
0
0

Infinite scroll is a useful technique that allows to load new content automatically, when the user  scrolls down and reaches the end of the page. This is the kind of feature that our customers asked us about for a fairly long time. Turns out, it is not that difficult to implement with the help of some custom coding.

  1. Enable ‘AJAX search, pagination, sorting’ option on Pages -> List page settings dialogue.
  2. Add the following code to List page: Javascript OnLoad event of the page where you need to implement infinite scrolling.


This is it. Enjoy!

Black Friday – Cyber Monday sale

$
0
0

Special offer: Buy one get one free

Time Remaining:


To take advantage of this offer place an order for any eligible product and contact support team with your order number to claim your gift. Buy two products – get two free gifts etc.

This offer applies to both new purchases and upgrades. Here is the list of eligible gifts:

How to scroll List page to the record that was edited

$
0
0

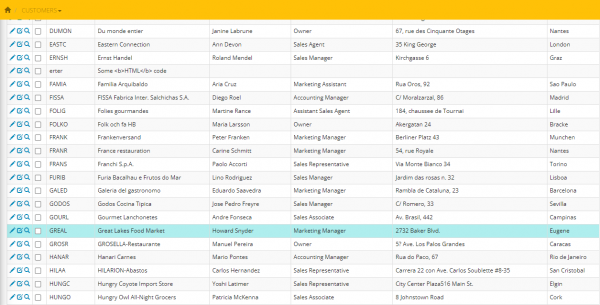
When you have a long List page with dozens of records, editing or viewing a record on a separate can be cumbersome. After you edit or view a record, clicking ‘Back to List’ will display all the records from the top and you lost the position of the record you just edited. This simple technique will allow you to scroll the List page back to the original position and also it will highlight the record that was just edited or viewed.

To implement this feature in your project, add the following code to respective events.

List page –> Javascript onload event

Add page –> Javasctipt onload event

Add page –> After Record Added event

PHP:

C#:

Edit page / View page –> Javascript onload event

Edit page / View page –> Bebore Display event

PHP:

C#:

This is it. Enjoy!

Drag-and-drop between dashboard elements

$
0
0

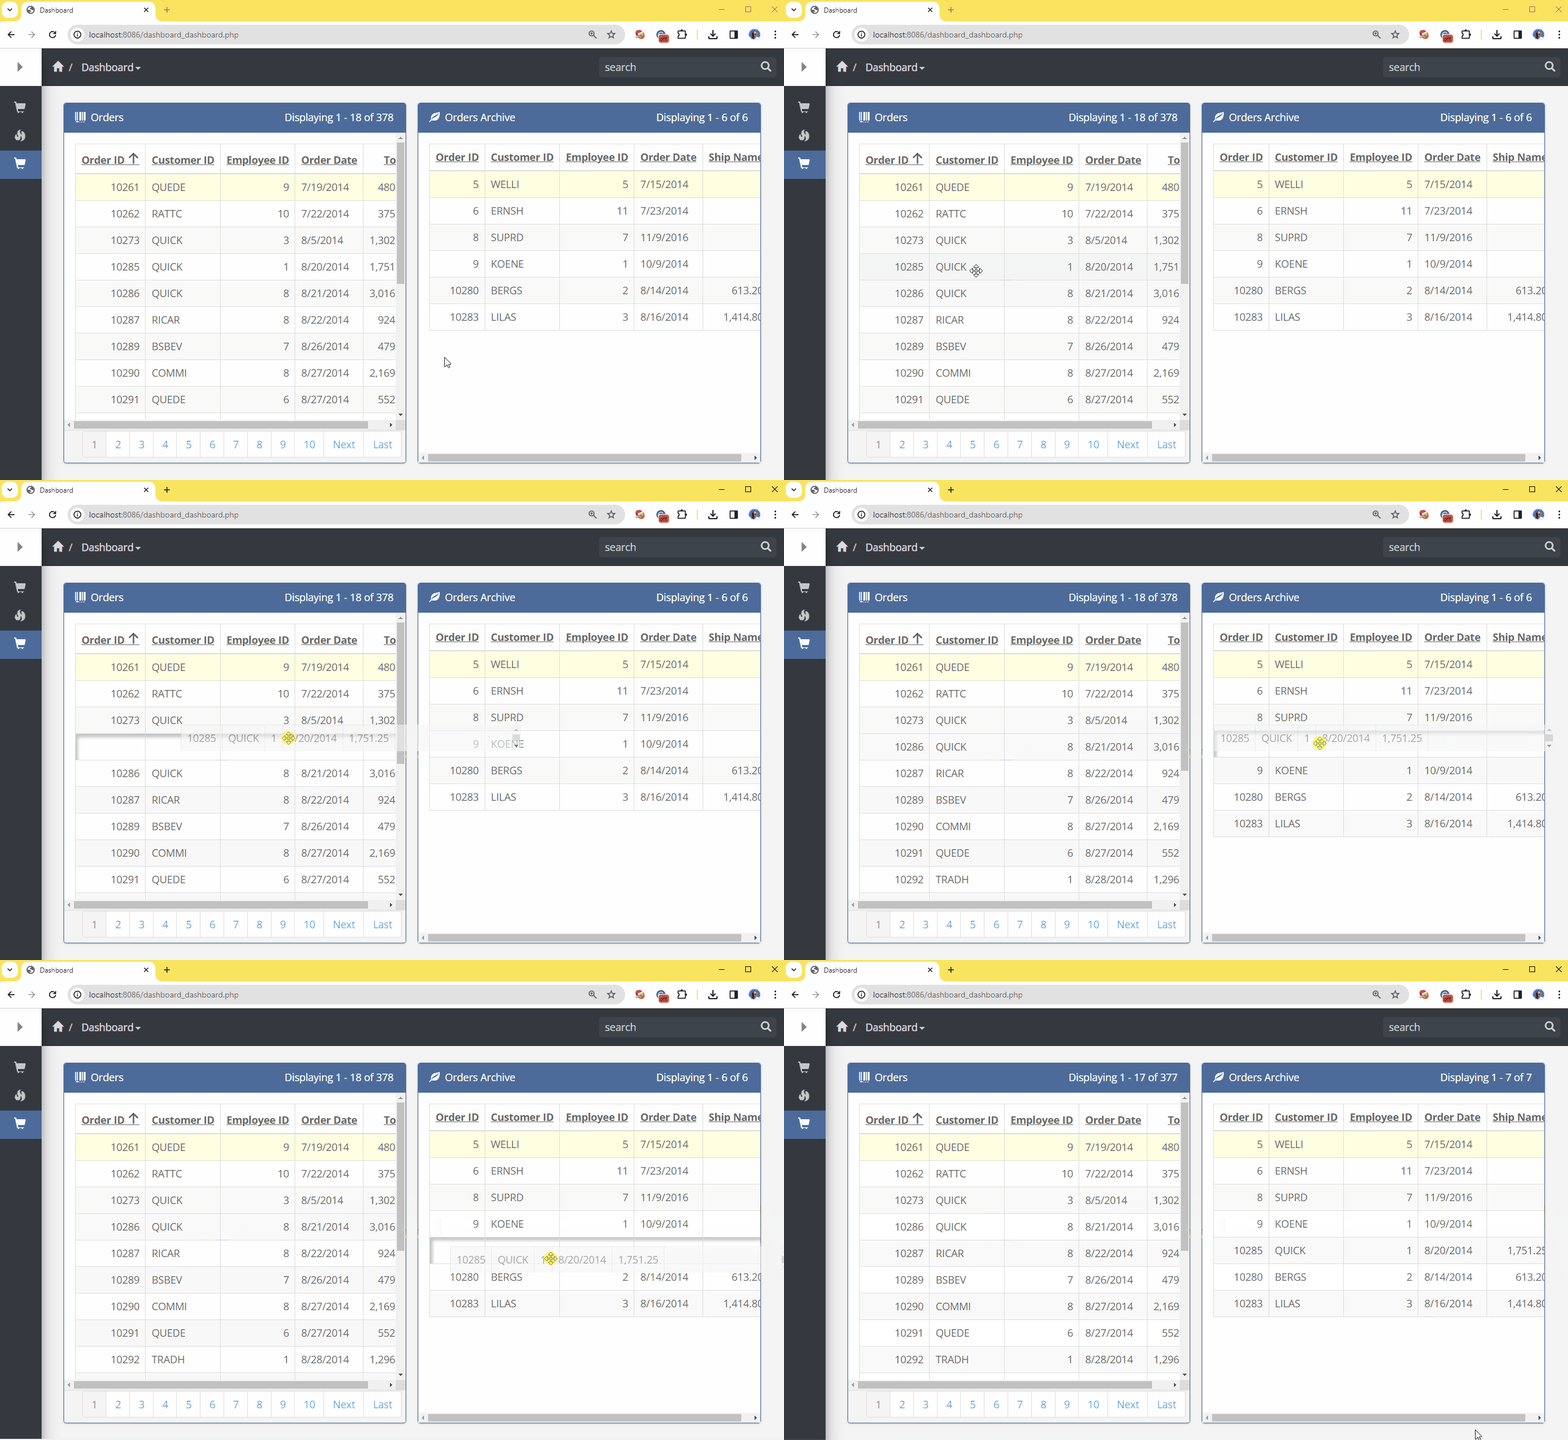
In this article we will show how you can implement drag-n-drop between two dashboard elements. It makes more sense to drag and drop records between two grids. In this example we will be using two tables named orders and orders_archive.

This is how it is going to look in the generated application:

1. SQL query that creates required tables in the database

2. Create a dashboard in PHPRunner or ASPRunner.NET and add those two tables there.

3. The following code goes to Javascript OnLoad event of both orders and orders_archive table List Pages.

Things to change:
– var connectTable should contain the name of another table. In orders table code it should say “orders_archive” and vice versa.
– “dashboard_dashboard.php” URL of the dashboard page. In ASPRunner.NET it will be something like dashboard
– “OrderID” – name of the key column of the current table.

4. Dashboard page: BeforeProcess event

In this event we add a new record to the target table and delete the same in the source table. The second section of this code helps us to update the sort order so

PHP code

C# code

Enjoy!

Clickable code snippet in a dashboard

$
0
0

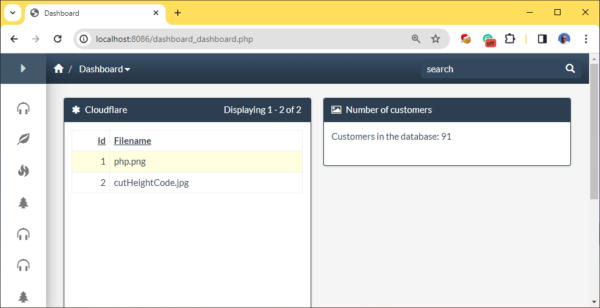
In this article we will show how you can easily create a clickable code snippet in a dashboard. Our snippet will display a number of customers in Customers table and clicking anywhere in snippet area will take us to the Customers table in question.


1. Add a code snippet to the dashboard. Use the following code. This is just a sample code and you can replace it with any code of your choice.

PHP

C#

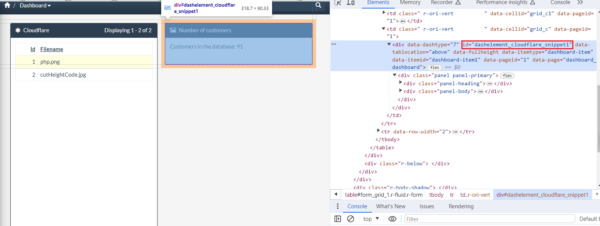
2. Build and run your application. Proceed to the dashboard page, right click on that snippet and choose ‘Inspect’. What we are looking for an ID of the DIV that encloses our code snippet. In our case it will be dashelement_cloudflare_snippet1.

3. Add the following code to Dashboard: Javascript OnLoad event. Here we are using the ID of the div we just found.

This is it. Enjoy!

Displaying website visitors on the map

$
0
0

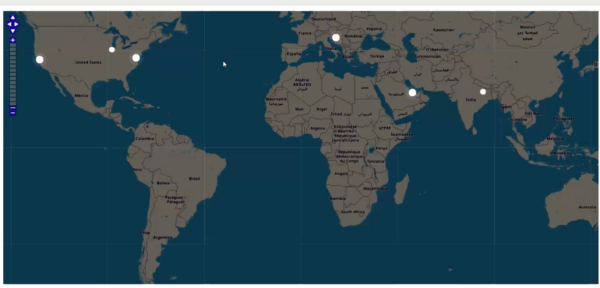
Our goal is to display website visitors on the map, similar to the screenshot below.

We will convert their IP address to lat/lng coordinates and display those markers on OpenStreetMap map. To perform the conversion of IP addresses to lat/lng pairs we are going to use the

1. Database structure.

We are going to need two tables, ‘users’ and ‘ip2location’. The following is the script for MySQL database.

Please note that this SQL script only creates ‘ip2location’ but doesn’t come with the data. The data set itself is about 300Mb and you can download it for free at https://lite.ip2location.com/database/ip-country.

2. Insert a code snippet into a page where you want to display the map. In our case it would be the menu page. The code itself is very simple, it merely outputs the div with ‘map’ ID.

PHP code:

3. AfterApplicationInitialized event

PHP code:

4. custom_function.js

The following Javascript code goes to Event Editor -> custom_function.js section.

$(document).ready(function() {

    $("#map").width($(".r-fluid").width());
    var height = $(window).height() - $("#map").offset().top - 30;
    $("#map").height(height);

    window.mapObj = new OpenLayers.Map("map", {
        controls: [
            new OpenLayers.Control.PanZoomBar(),

            new OpenLayers.Control.Navigation()
        ],
    });

    var layer = new OpenLayers.Layer.OSM();

    mapObj.addLayer(layer);

    window.markersList = new OpenLayers.Layer.Markers("Markers");
    mapObj.addLayer(markersList);
    mapObj.zoomToMaxExtent();

    updateMarkers();
    setInterval(updateMarkers, 5000);

    function updateMarkers() {

        $.post("", {
            getActiveUsers: true
        }, function(response) {

            var coordsArr = JSON.parse(response),
                activeIds = coordsArr.map(function(coords) {
                    return coords.id;
                }),
                allIds = markersList.markers.map(function(marker) {
                    return marker.id;
                });


            $.each(coordsArr, function(i, latLon) {

                if (!allIds.includes(latLon.id)) {
                    addMarker(latLon.id, latLon.lat, latLon.lng, latLon.active);
                } else {
                    var curMarker = markersList.markers.find(function(marker) {
                        return marker.id == latLon.id
                    });
                    if (curMarker.active != latLon.active) {
                        $(curMarker.icon.imageDiv).toggleClass("active", latLon.active);
                    }
                }
            });
            allIds = markersList.markers.map(function(marker) {
                return marker.id;
            });

            for (var i = 0; i < allIds.length; i++) {

                if (allIds[i] != undefined && !activeIds.includes(allIds[i])) {

                    var markerToRemove = markersList.markers.find(function(marker) {
                        return marker.id == allIds[i]
                    });
                    markersList.removeMarker(markerToRemove);
                }

            }

            function addMarker(id, lat, lng, active) {

                var lonLat = new OpenLayers.LonLat(lng, lat)
                    .transform(
                        new OpenLayers.Projection("EPSG:4326"), // transform from WGS 1984
                        mapObj.getProjectionObject() // to Spherical Mercator Projection
                    );
                var icon = new OpenLayers.Icon("", new OpenLayers.Size(15, 15));
                var marker = new OpenLayers.Marker(lonLat, icon);
                if (active) {
                    $(marker.icon.imageDiv).addClass("active");
                }

                marker.id = id;
                marker.active = active;
                markersList.addMarker(marker);

                return marker;
            }
        });


    }
    updateMarkers();


});

5. CSS code ( Style Editor -> Modify CSS )

We use this CSS code to customize and prettify the default look of OSM map.

PHPDesktop update

$
0
0

As you might know, we teamed up with PHPDesktop developer to bring it to the latest version of Chromium and PHP. Now we have PHPDesktop 130.1 at our disposal that runs PHP 8.3. It will be a part of PHPRunner 11 soon and meanwhile I will show you how to upgrade PHPDesktop in your PHPRunner 10.91 installation.

1. Download updated PHPDesktop. Unzip it to C:\Program Files\PHPRunner 10.91\DesktopApp keeping directory structure and overwriting existing files.

2. Download updated phprunnerapp-setup.iss file and replace the existing one in C:\Program Files\PHPRunner 10.91\DesktopApp folder.

This is it! Now you can use PHPRunner 10.91 to build desktop apps that support PHP 8.3.


Viewing all 95 articles
Browse latest View live